1 min read
Recipe for Planet Formation
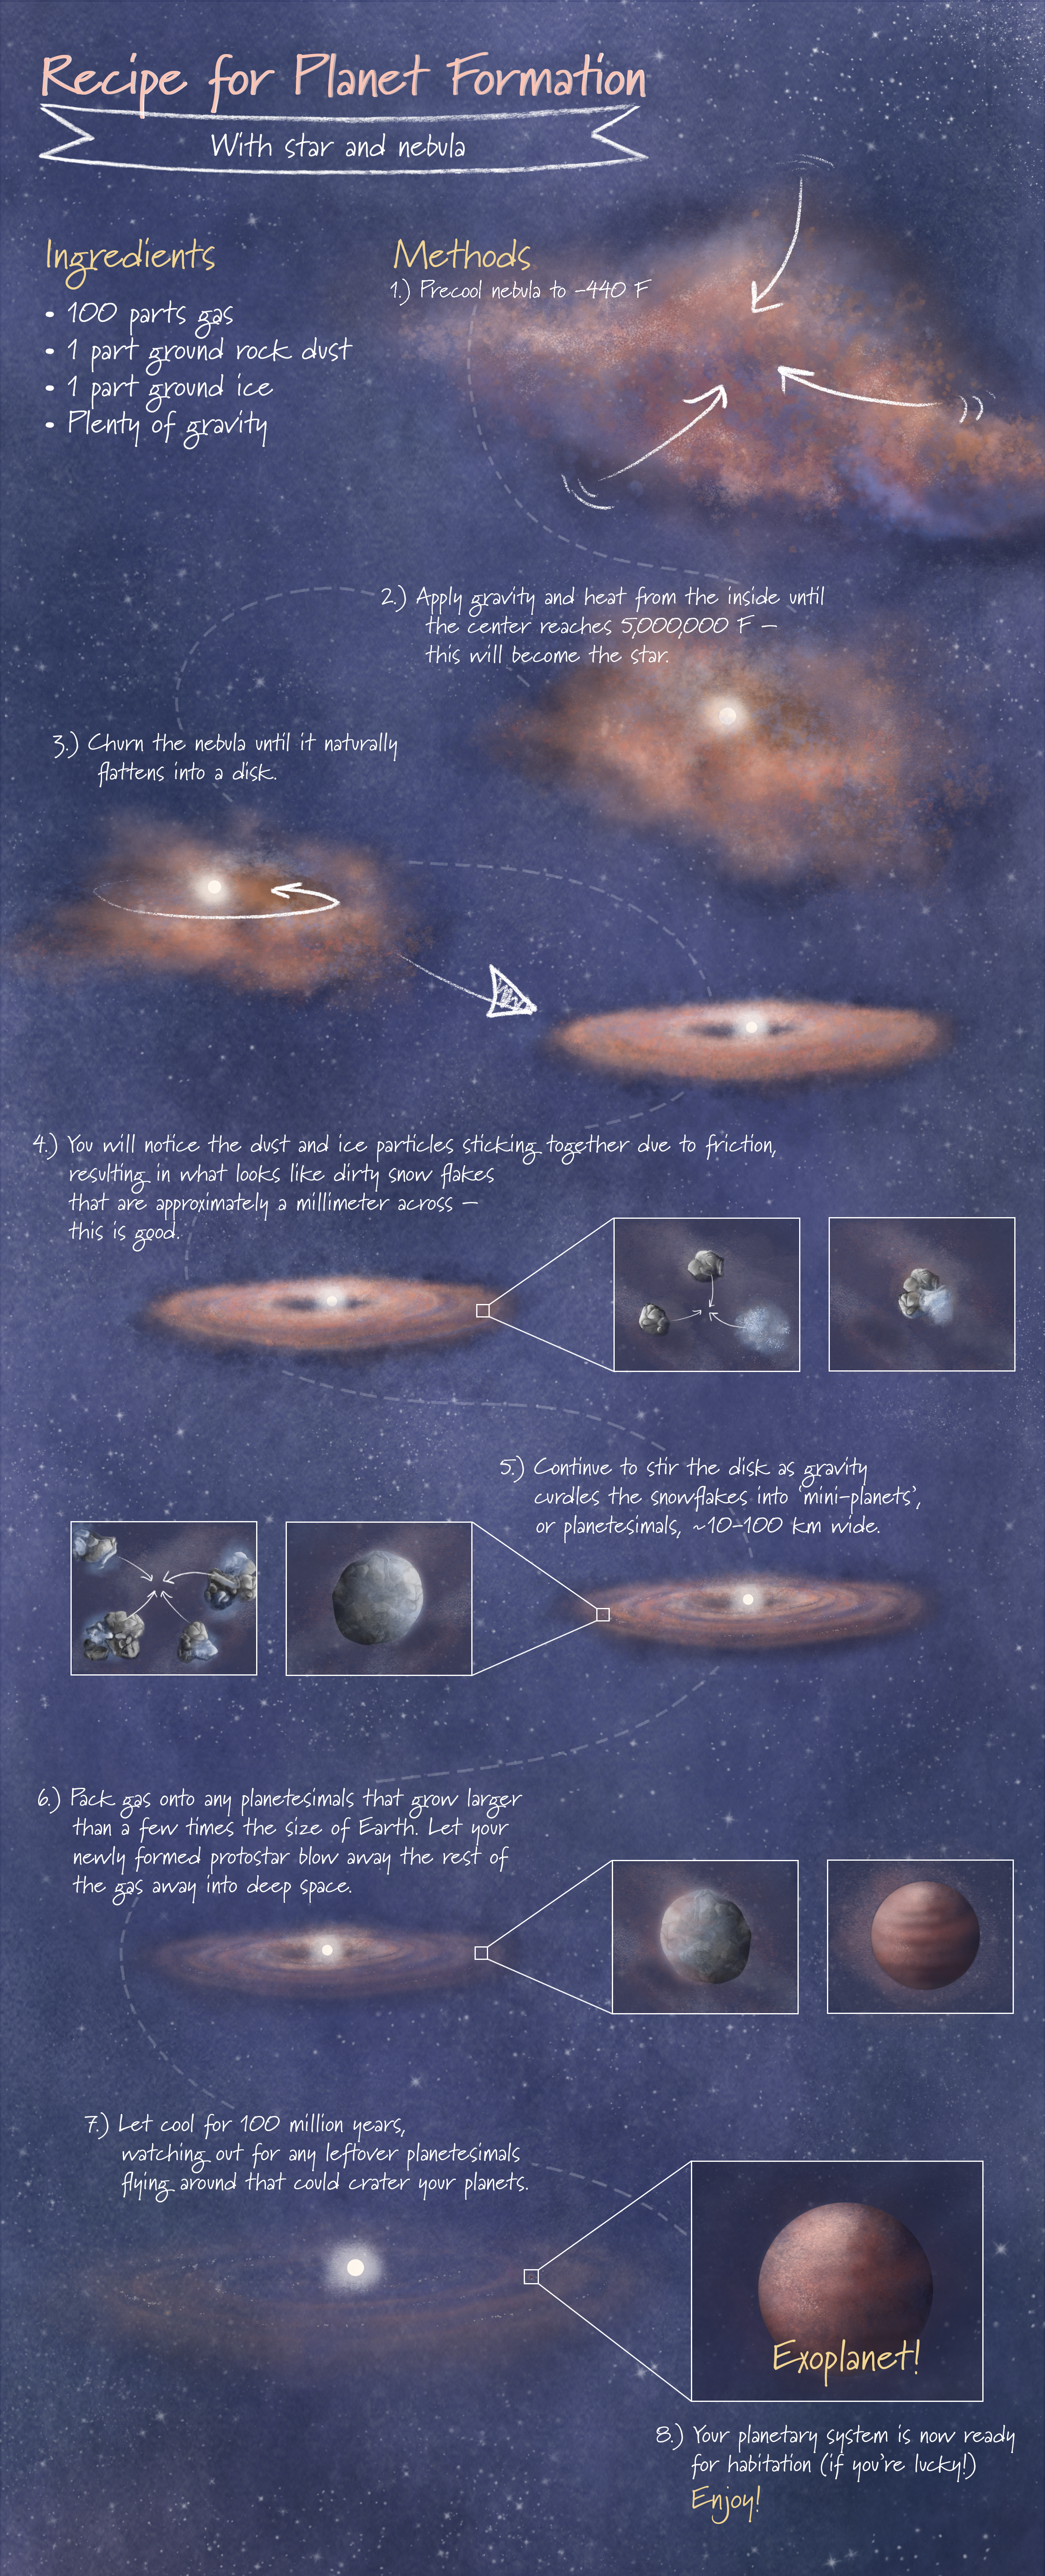
This infographic is a simplified artistic representation of planet formation, following the format of a baking recipe.
Extended Description and Image Alt Text
Extended Description
Long vertical infographic titled “Recipe for Planet Formation, with star and nebula” has text and illustrations on a hazy blue background scattered with white dots. The text font resembles handwriting and the illustrations look hand-drawn, for an overall design reminiscent of pages in a cookbook or baking magazine.
Ingredients
At the upper left, just below the title, is a bulleted list titled, "Ingredients."
- 100 parts gas
- 1 part ground rock dust
- 1 part ground ice
- Plenty of gravity
Methods
To the right of the ingredients list is a list titled, "Methods." Numbered steps in the recipe are threaded throughout the infographic from top to bottom. Each step includes a short sentence with an illustration or set of illustrations.
Step 1
Text: Pre-cool nebula to negative 440 degrees Fahrenheit.
Illustration: This part of the infographic shows a cloudy, somewhat clumpy, pink-and-purple blob shaped like a stingray seen face-on. Three white arrows point from the edges toward the center. There is no clear structure.
Step 2
Text: Apply gravity and heat from the inside until the center reaches 5 million degrees Fahrenheit. This will become the star.
Illustration: The clumpy pink and purple blob has become pinker and has a more compact, oval shape. At the center is a distinct bright white sphere with a hazy white circular area around it.
Step 3
Text: Churn the nebula until it naturally flattens into a disk.
Illustration: The pink blob with the white sphere, the central star, is now even more compact. A white arrow circles counter-clockwise around the central star to show motion within the disk.
Illustration: Another white arrow points from the pink blob to the next illustration of the disk. The irregular shape has transformed into an oval-shaped disk that surrounds the white central star. There is now space carved out between the disk and the star, which allows the purple background to show through. The view of the disk is slightly oblique, tilted toward the viewer so that both the top and the side are visible.
Step 4
Text: You will notice the dust and ice particles sticking together due to friction, resulting in what looks like dirty snowflakes that are approximately a millimeter across. This is good.
Illustration: The disk looks very similar to Step 3, but there is more space carved out between the pink material and the white star, as well as hints of rings (empty space) forming within the disk. On the right side of the outer edge of the disk is a white square that leads to two zoom-in illustrations pulled out to the right. The first pull-out illustration shows two rocks, one at left and the other at the top, and a blue and white icy ball at the right. Each has an arrow pointing to the center. The second pull-out illustration shows the two rocks and the piece of ice clumped together.
Step 5
Text: Continue to stir the disk as gravity curdles the snowflakes into “mini-planets,” or planetesimals, about 10 to 100 kilometers wide.
Illustration: The disk now has even more structure, with thin gaps that look like dark concentric rings. The star at the center is a little brighter, with less haze. On the left side of the outer edge of the disk is a white square that leads to two zoom-ins pulled out to the left. The pull-out at the far left shows four conglomerations of rock and ice like that formed in Step 4. Each has a white arrow pointing toward the center. The illustration to the right shows all of the material combined into a roughly spherical planetesimal.
Step 6
Text: Pack gas onto any planetesimals that grow larger than a few times the size of Earth. Let your newly formed protostar blow away the rest of the gas away into deep space.
Illustration: The planetary disk looks almost the same as in Step 5, but is dimmer. The white star at the center is still bright. On the right side of the outer edge of the disk is a white square that leads to two zoom-ins pulled out to the right. The first shows a roughly spherical, gray planetesimal with a slight pink haze on its left side. The second shows a spherical planetesimal with horizontal pink stripes and a pink haze representing a planetary atmosphere.
Step 7
Text: Let cool for 100 million years, watching out for any leftover planetesimals flying around that could crater your planets.
Illustration: The disk around the star is now very dim, represented only by a few transparent pink rings that are wider than in the previous illustration. The star appears larger and is surrounded by white haze. On the right side of the disk is a white square that leads to a zoom-in pulled out to the right. The illustration shows a circular pink exoplanet with some purple specks across it. It is labeled “Exoplanet!”
Step 8
Text: Your planetary system is now ready for habitation (if you’re lucky!) Enjoy!
Image Alt Text
Infographic titled “Recipe for Planet Formation, with star and nebula” has text and illustration design reminiscent of pages in a cookbook or baking magazine.
- Release DateDecember 16, 2020
- Science ReleaseDetailing the Formation of Distant Solar Systems with NASA’s Webb Telescope
- CreditImage: NASA, ESA, CSA, Leah Hustak (STScI)
Related Images & Videos
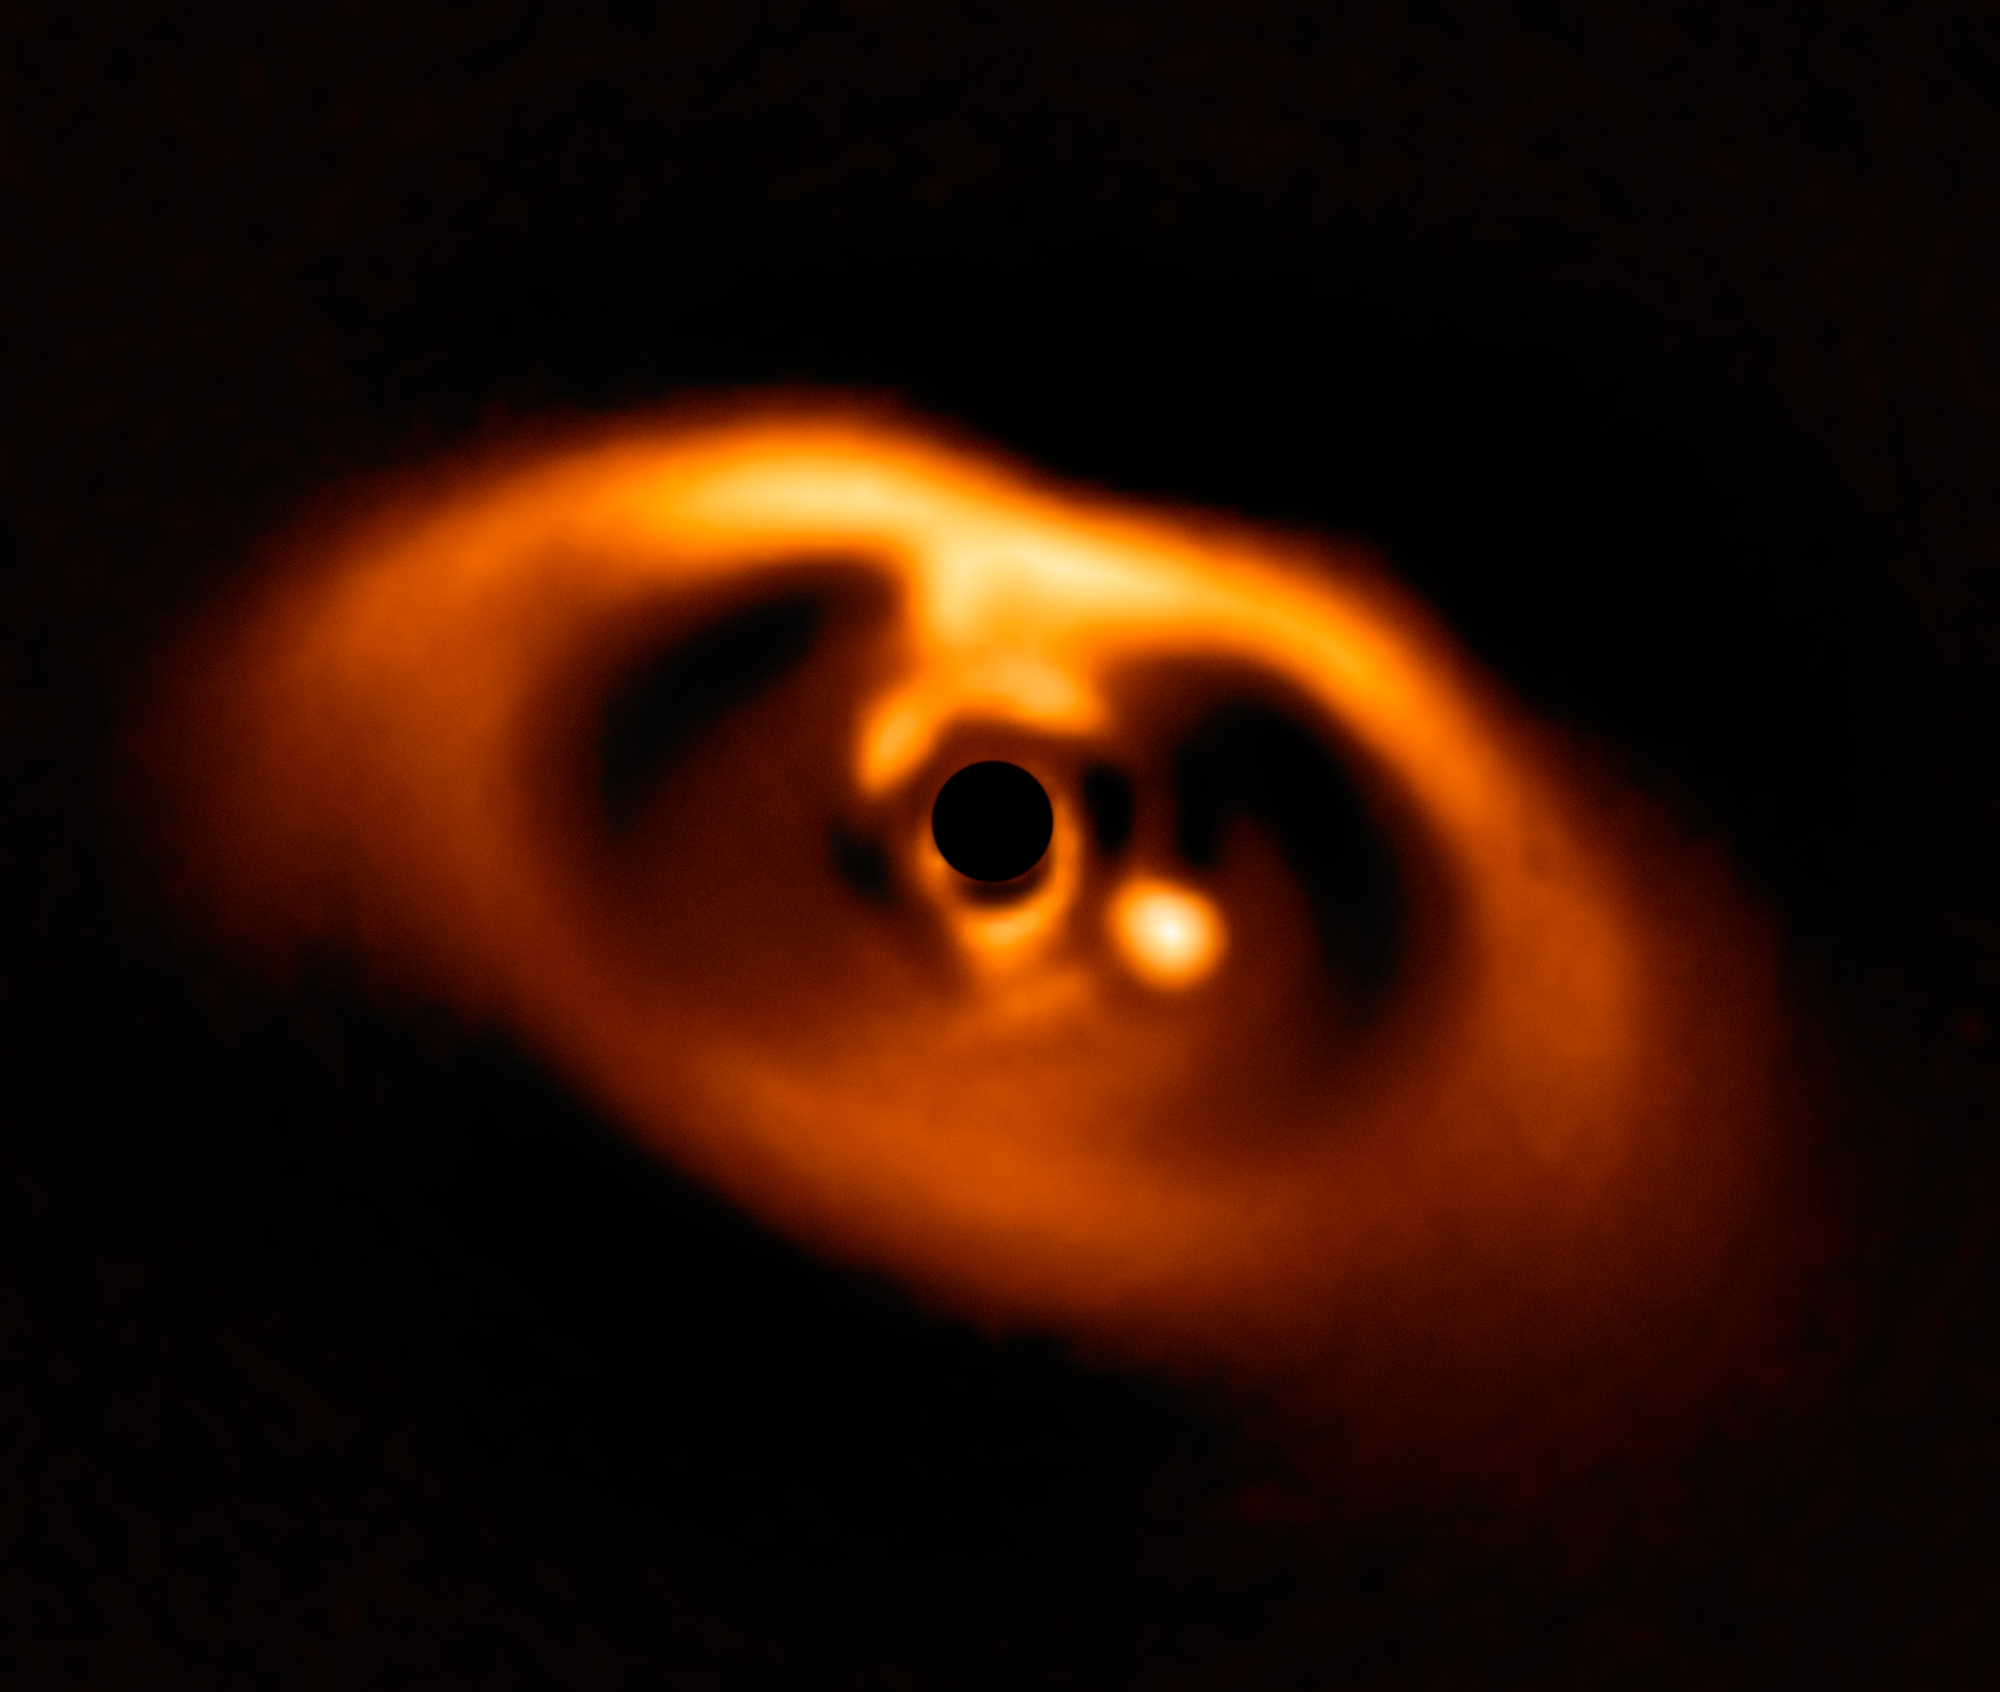
Protoplanetary Disk Around Dwarf Star PDS 70 (VLT)
PDS 70 is approximately 370 light-years away and features a large gap in its inner ring. The European Southern Observatory's Very Large Telescope provided the first clear image of a planet forming around the central star in 2018. The planet is a bright point to the right of the...
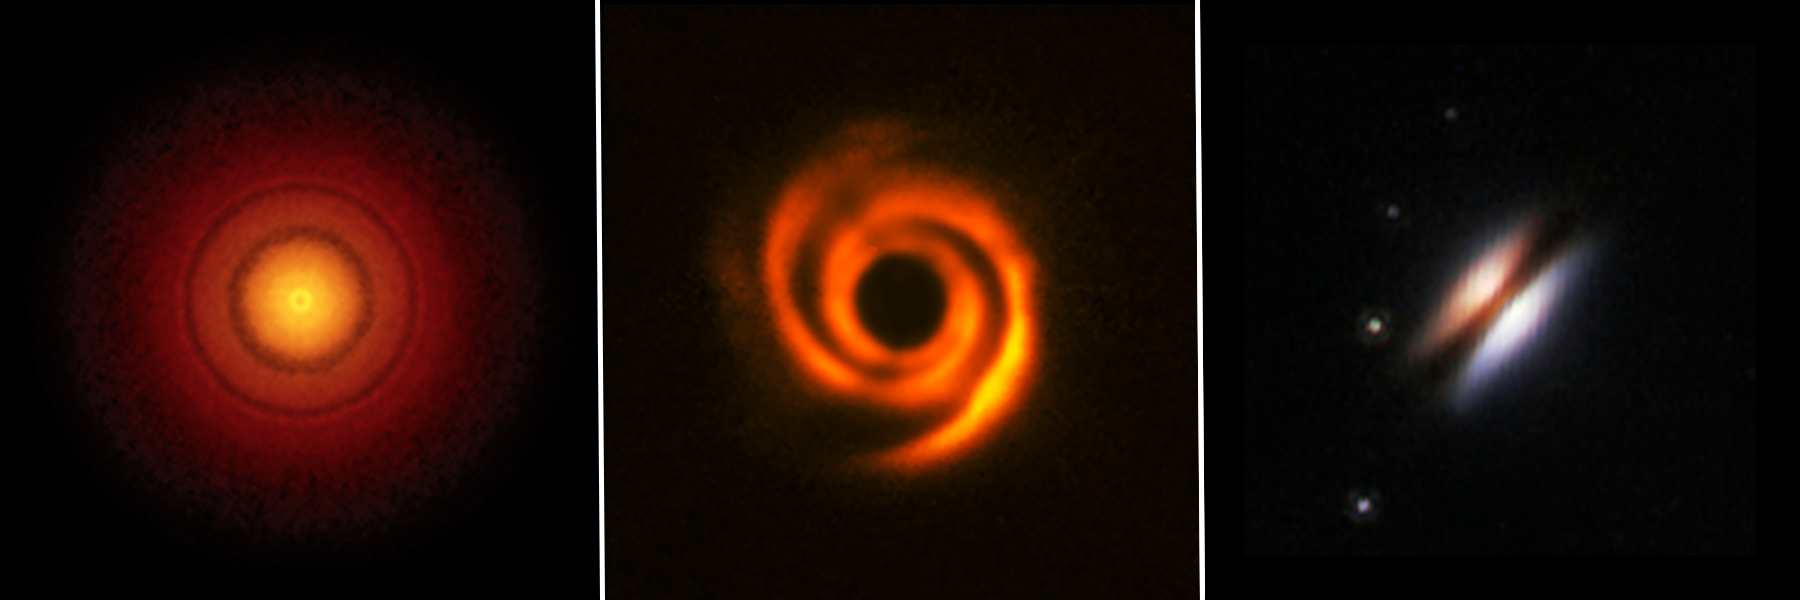
Protoplanetary Disks (ALMA, VLT, Hubble)
Still-forming solar systems, known as planet-forming disks, come in a variety of shapes and sizes — and some show that bodies like forming planets may be clearing paths as they orbit the central stars. A research team led by Thomas Henning of the Max Planck Institute for...
Share
Details
Laura Betz
NASA’s Goddard Space Flight Center
Greenbelt, Maryland
laura.e.betz@nasa.gov
NASA, ESA, CSA, Leah Hustak (STScI)