


How Are Webb’s Full-Color Images Made?
A lot of care is poured into processing the telescope’s full-color images, which begin as black-and-white exposures.
Taking a full-color photo is typically instantaneous. Many of us walk around with powerful cameras in our pockets—our smartphones. What may be less obvious is that the images smartphones take begin as binary code, long lists of zeros and ones known as bits. But we don’t see the binary code. Instead, a full-color image almost immediately appears on screen. For Webb’s cameras, a full-color image is not an instant second step. Why? Much of it is owed to their complexity as scientific instruments, which are far more advanced than those we point and shoot.
Let’s start by reminding ourselves of where this powerful observatory is located. Webb follows a halo orbit 1.5 million kilometers (1 million miles) from Earth. It’s not exactly nearby. Despite this, it takes only five seconds for Webb to send data to Earth. But those data aren’t delivered as an image. Instead, the data are transmitted to Earth in the form of bits. When the binary code hits “home,” at the Barbara A. Mikulski Archive for Space Telescopes (MAST), the bits are transformed into black-and-white images, and these unprocessed images are made available to the public quickly, unless there is a proprietary research period (typically one year).
How exactly is color applied to Webb’s images? Whether you are an astrophotographer, a researcher, or imaging specialist at the Space Telescope Science Institute (STScI), processing a Webb image is a human-centered process. Here, we detail how these images are made at STScI, including how Webb’s infrared light is mapped to the visible light our eyes can perceive.
In This Article:
Combining Near- and Mid-Infrared Images
Video: Composing Webb Telescope Images
Get video details and downloads in the Video gallery, or download video captions (VTT, 14 KB), and transcript of the audio description (Word Doc, 22 KB).
Downloading Raw Image Files
All data, or images, from Webb’s cameras are located in MAST.
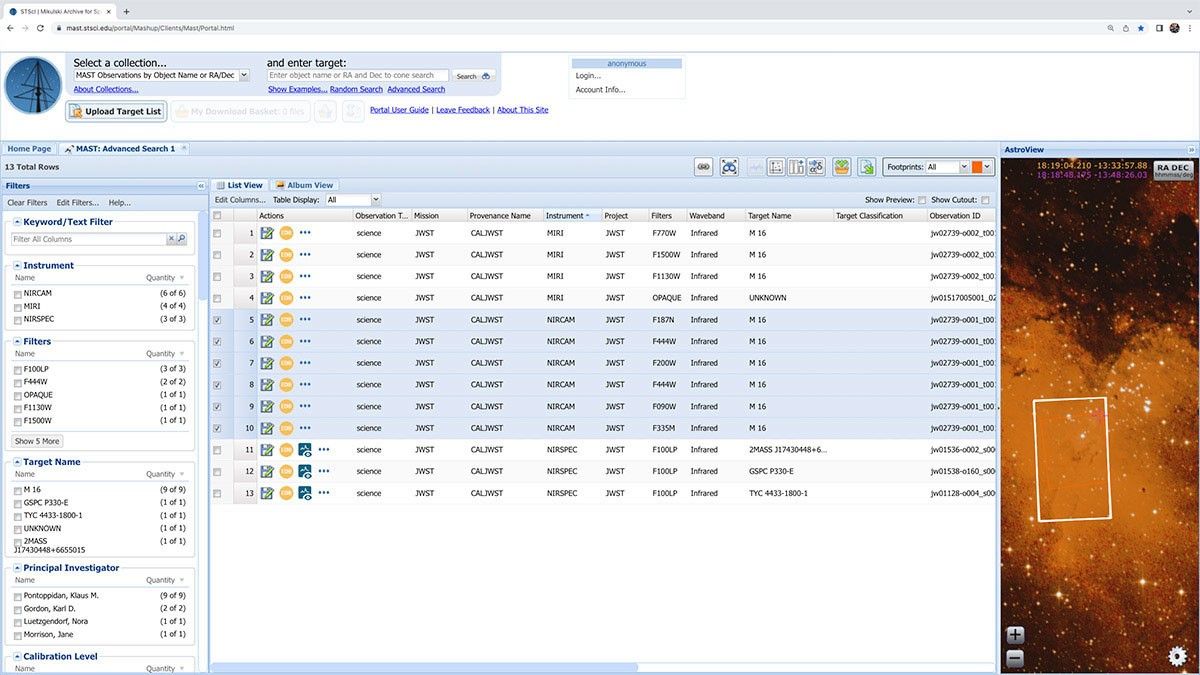
The Barbara A. Mikulski Archive for Space Telescopes (MAST) stores data from more than 20 telescopes, including Webb. STScI’s imaging specialists start by running an advanced search in MAST. They add the target’s name or the object’s coordinates on the sky (known formally as right ascension and declination), along with the mission (JWST in this case). Like any other search, MAST returns the results.
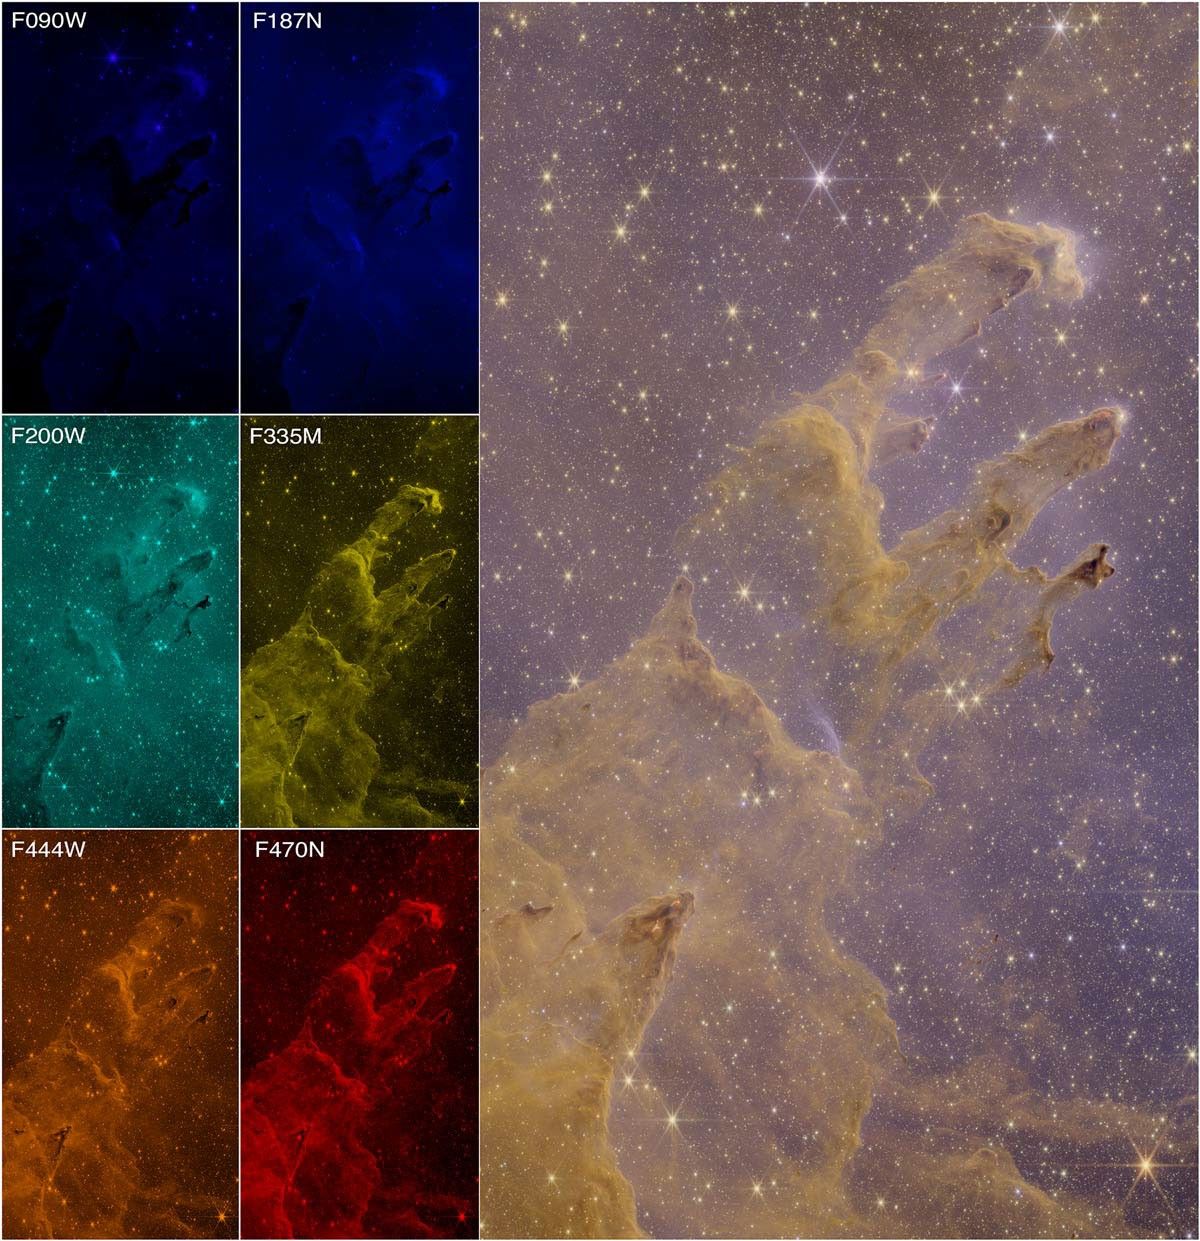
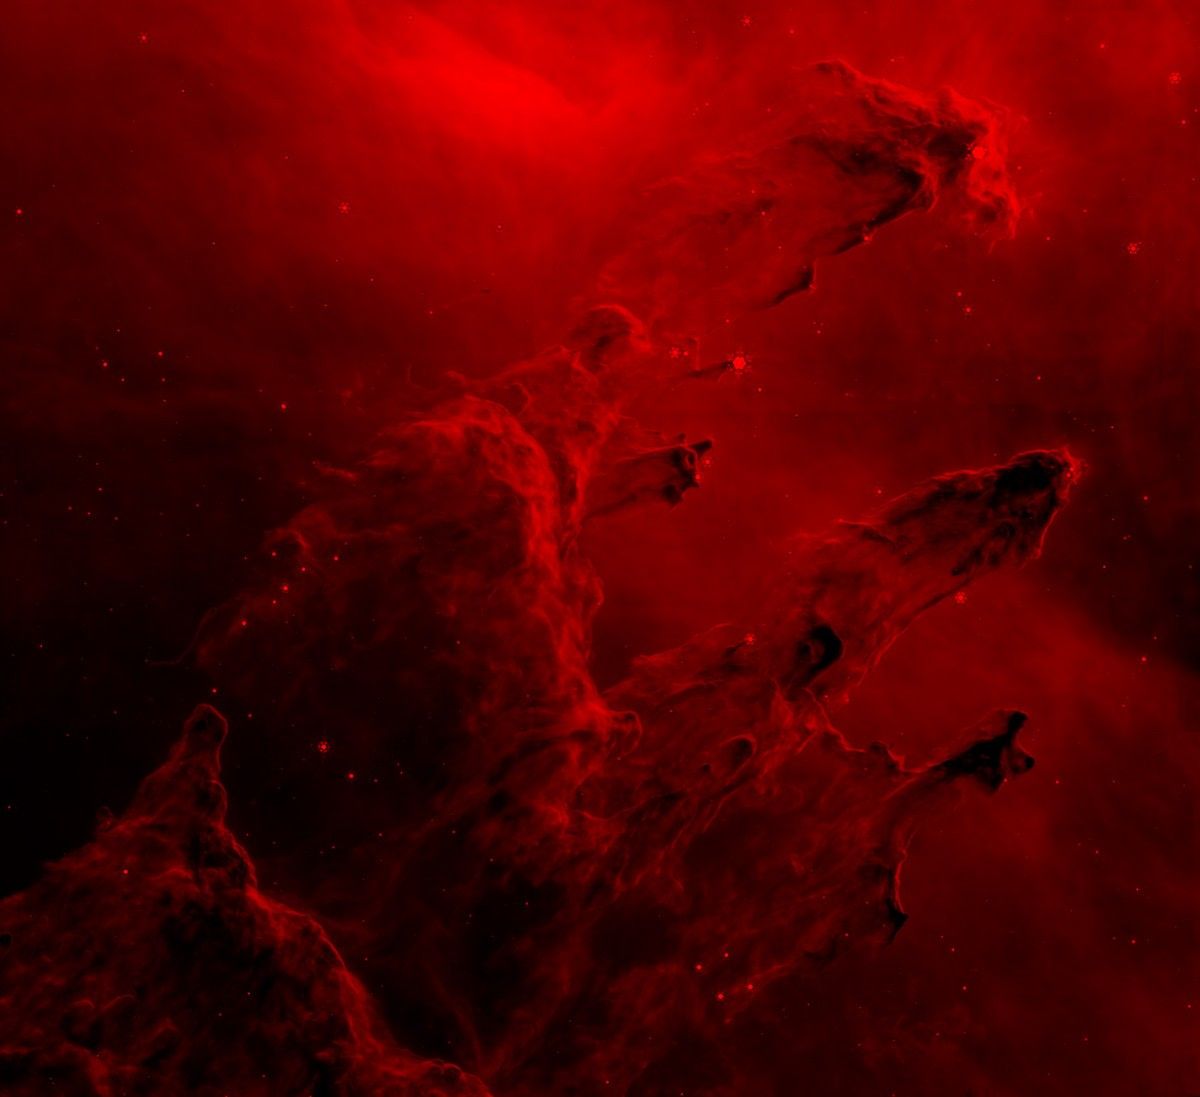
In the case of the near-infrared image of the Pillars of Creation, which was taken by Webb’s Near-Infrared Camera (NIRCam), six results appear. The search results detail which filters Webb used to observe the target. Next, our imaging specialists select which files to download. The downloads are available as Flexible Image Transport System (FITS) files, but our staff identify the image files and only download those. FITS files are tailored to the astronomy community, so they may contain additional information, like spectra, data cubes, photometric and spatial calibration details, and metadata. The mix depends on what the instrument is capable of capturing and what the researcher taking the observations requested. Sometimes the data products that are available for download number in the thousands. Luckily, users can select the “download minimum files” box to avoid crashing their computers.
Defining the Raw Images
Imaging specialists stretch, or rescale, images to reveal their contents. Then they match the resolution of every image.
Astronomical images are typically built with multiple exposures, which is another reason why they require time and care to process. One image from Webb might be 140 megabytes (MB), but another could be 5 gigabytes (GB). Unlike our handheld cameras, many of Webb’s filters within its cameras target specific elements or molecules. For example, some of NIRCam’s filters are designed to detect hydrogen, iron, water, and methane. This means the individual images need to be matched up to create a single, aligned composite image. In total, NIRCam has 29 filters, so our imaging specialists pay careful attention to the contents of each.
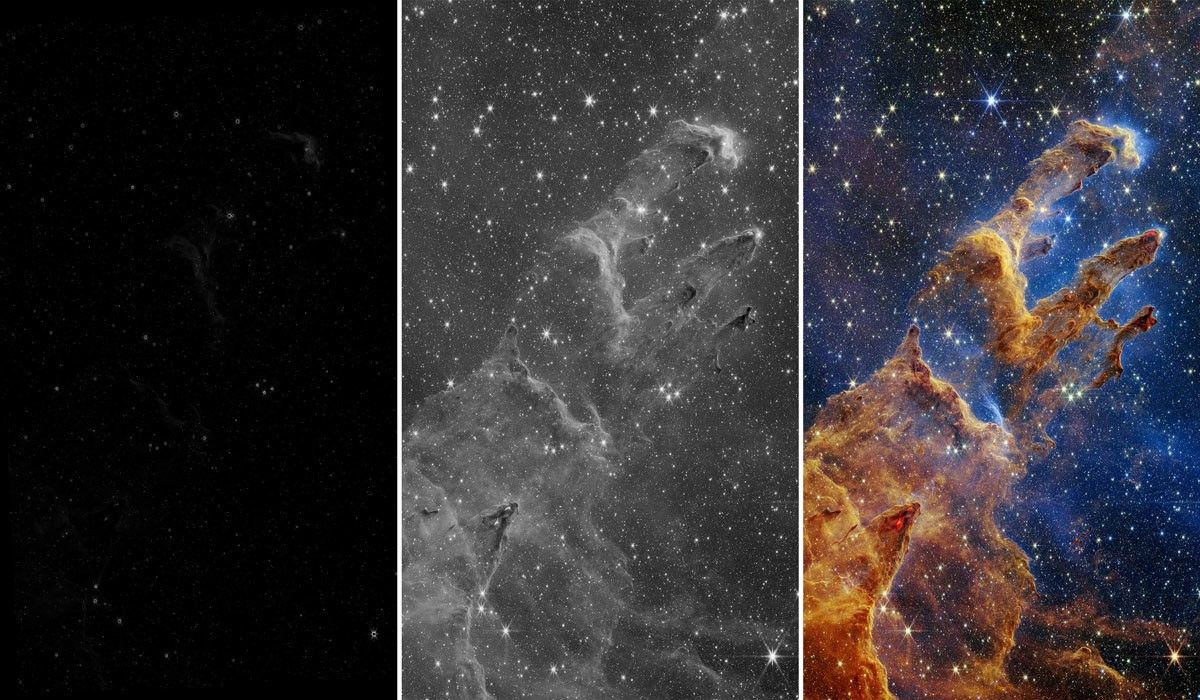
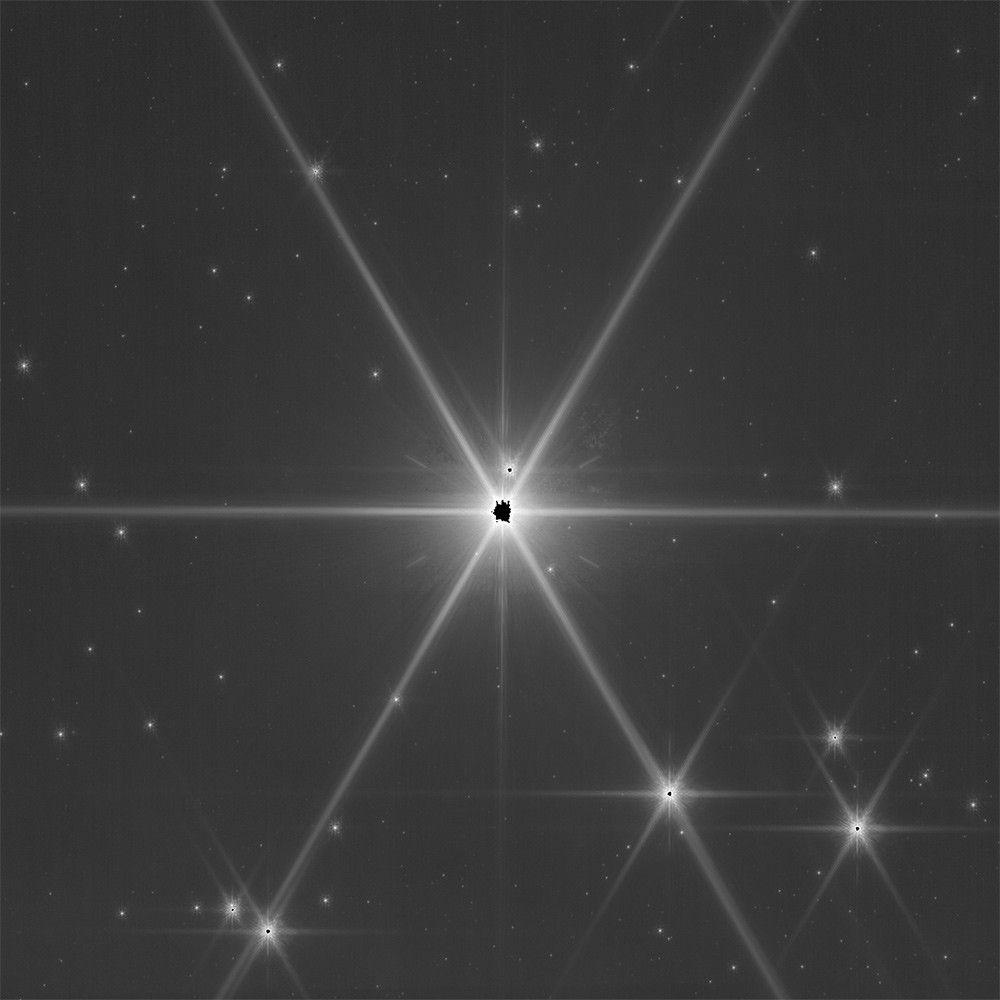
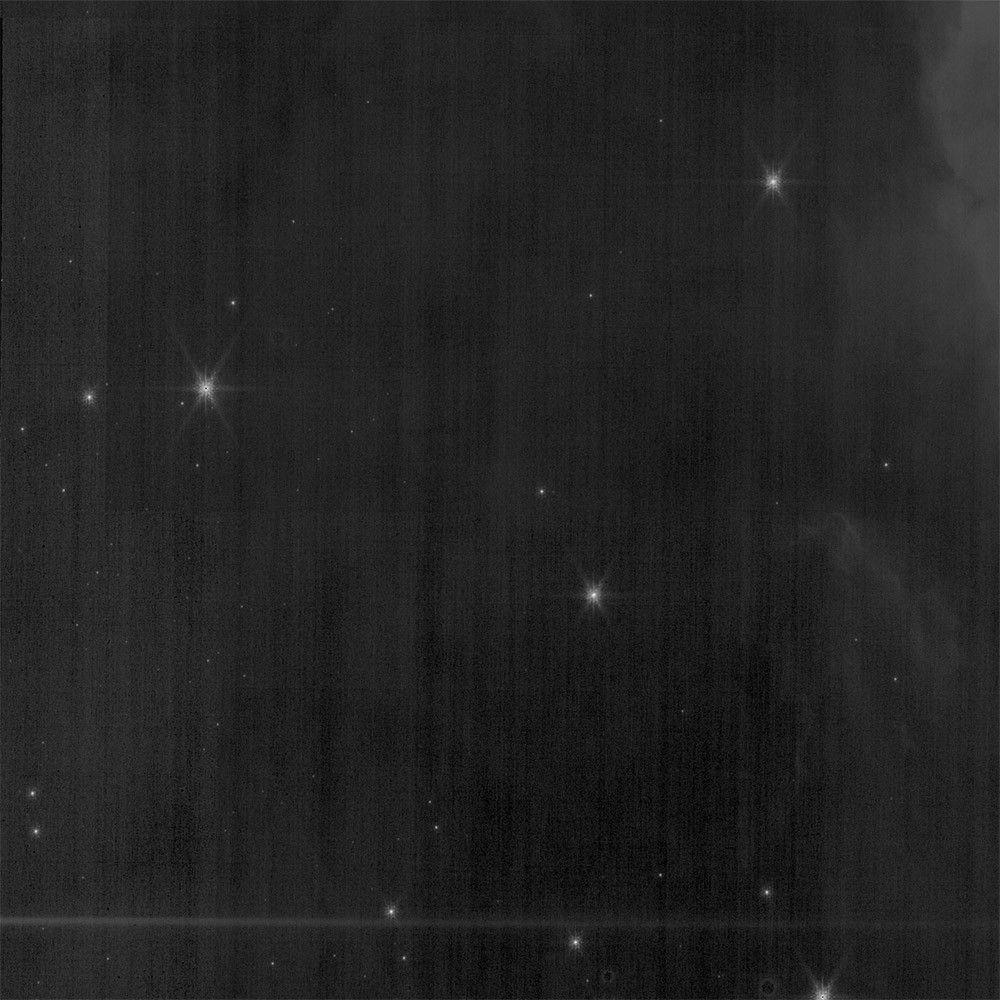
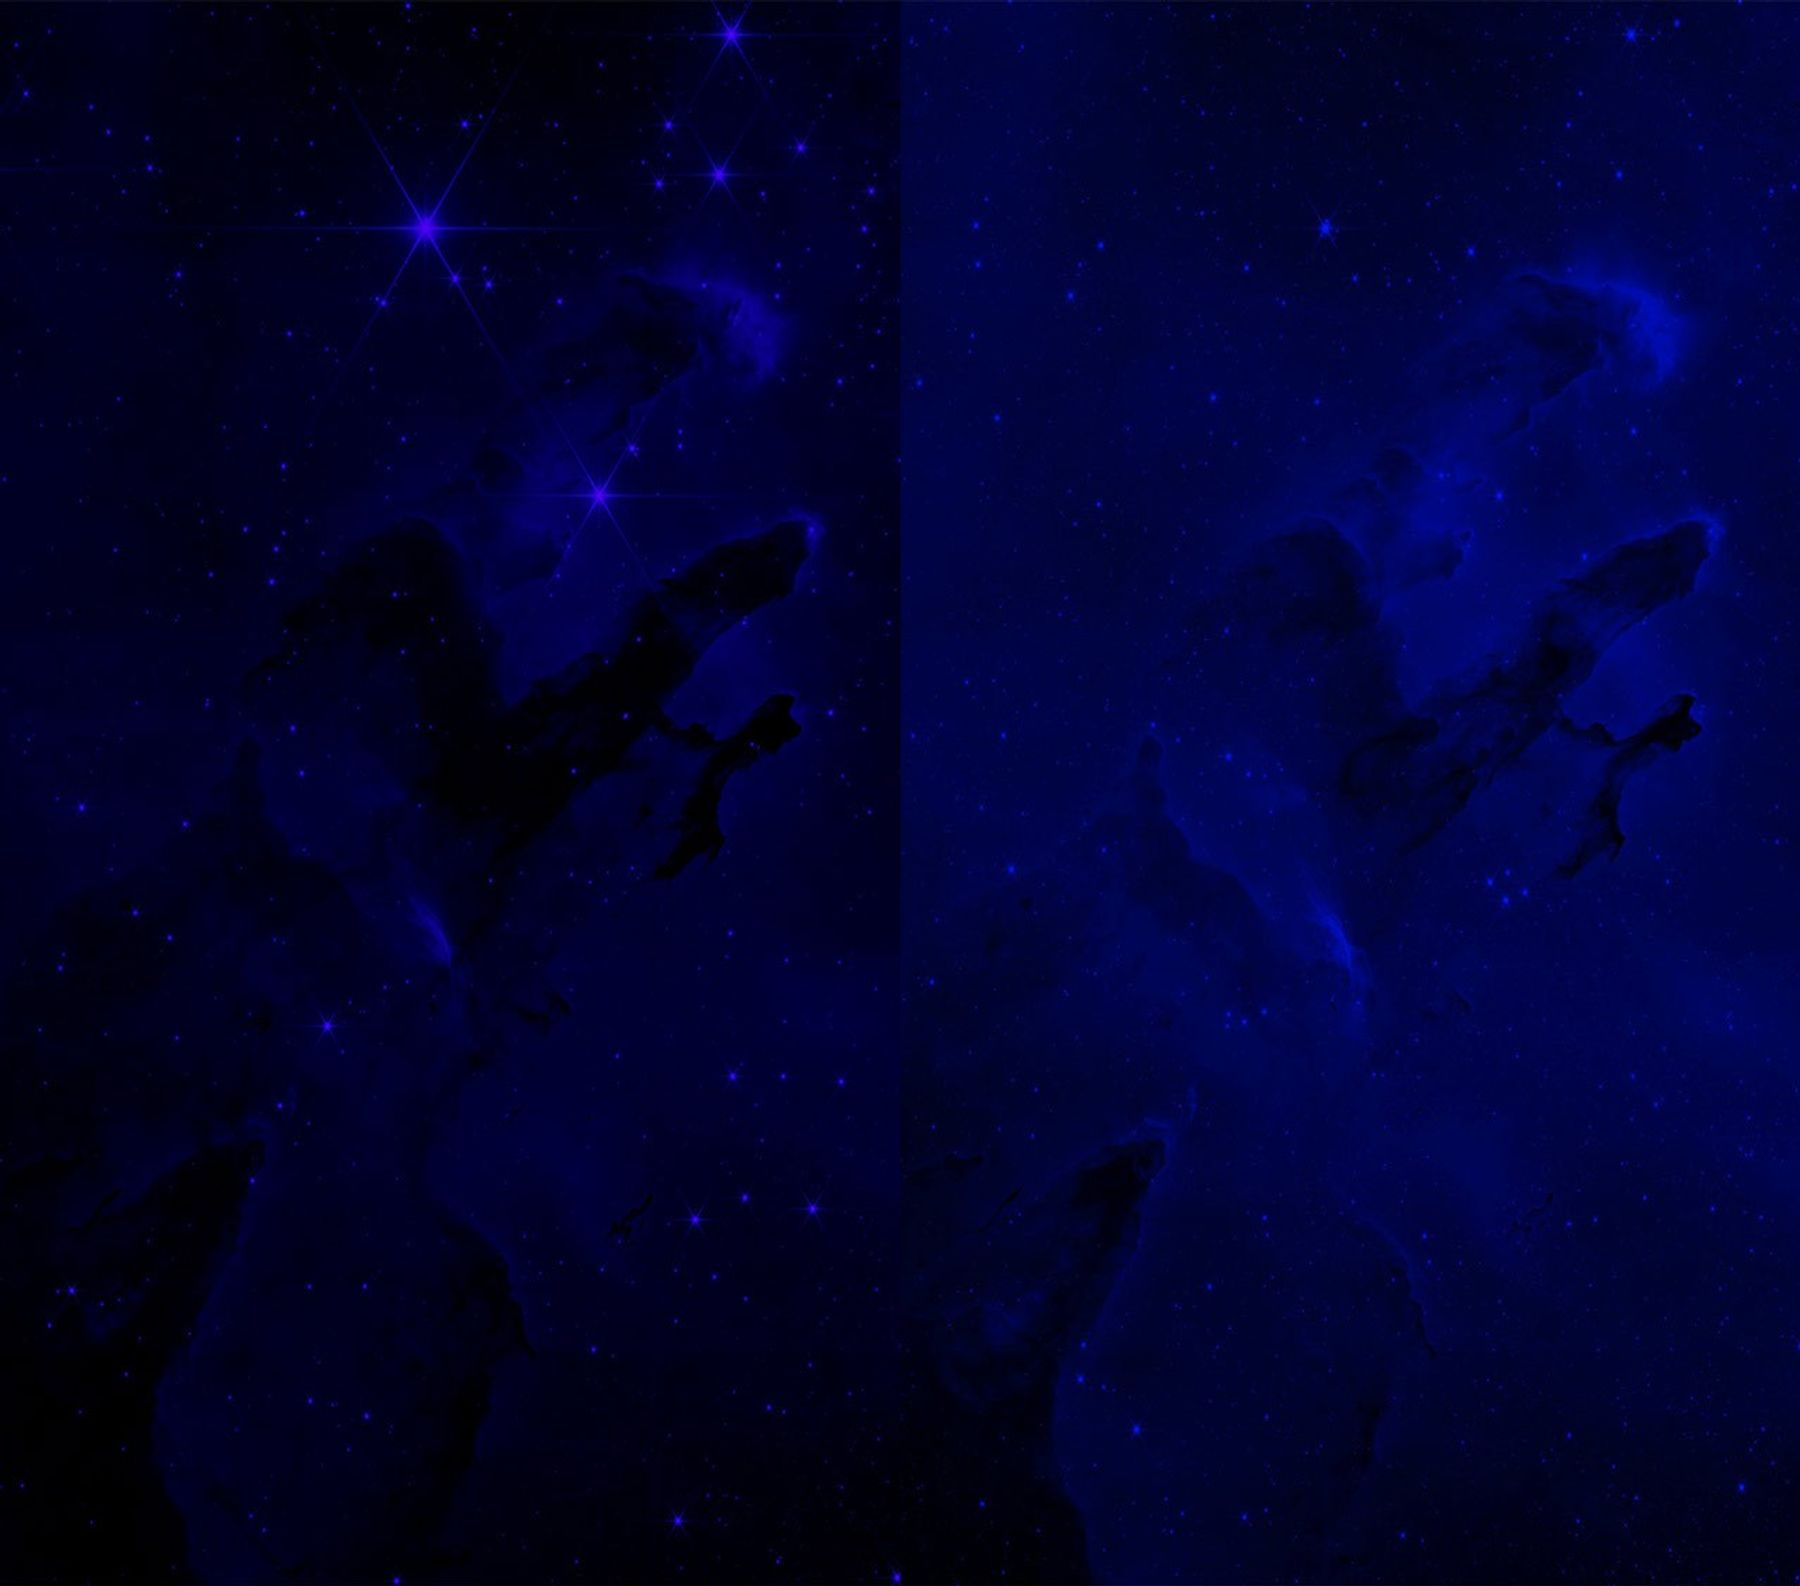
When any of Webb’s raw images are initially opened, they appear almost totally black. This doesn’t mean they contain no information. Instead, they require stretching or rescaling to identify where the information was captured within that particular filter’s image. The universe is very dim, especially in infrared light, so the most interesting parts of a Webb image are buried in the darkest regions.
Webb’s detectors are so sensitive that they can capture more light than our eyes or screens can process in its raw form. This is known formally as dynamic range—and Webb’s dynamic range is vast! In every Webb image, each pixel can be one of over 65,000 different shades of gray. Think of Webb’s detectors like light buckets. As Webb observes, it collects everything it detects, filling its “buckets” with light. Now imagine dumping one large bucket’s contents into a dollhouse-sized teacup to compress what was captured and present it in a format that we can perceive and our computers can display. Stretching Webb’s images allows image specialists to see variation in the pixel values and highlight the bulk of what was captured in the image. A mathematical function is used to increase the brightness of the darkest pixels, while maintaining details within brighter pixels in the image. Stretching and compression are required because Webb’s images have a vast dynamic range.

Our staff uses FITS Liberator to see each pixel’s specific numerical value and adjust what’s shown to ensure they are preserving the scientific detail in each image, which is known as stretching. They repeat this process for every filter they may use in the final composite image.
Next, our imaging specialists upscale longer wavelength images so they match the higher resolution of shorter wavelength images. And, yes, it is possible to do this while maintaining the overall image quality! For example, NIRCam takes high-resolution images that range in size. Images from NIRCam’s shorter near-infrared filters are typically twice the size of images from its longer near-infrared filters. No two images are precisely the same. During this portion of the image editing, our staff align the images to ensure they have the same scale and resolution.
At this stage, all the individual images that will be used to create the final NIRCam composite are the same size, resolution, and have a better overall contrast, allowing our staff to see textures, highlights, and shadows. However, this is only the initial pass. Think of this portion of the process like stacking papers that were scatted across your desk in precise, orderly piles before you begin fully analyzing what they contain.
Removing Artifacts
Editing star cores—and hunting for striations, repeated stars, and stray cosmic rays.
At this stage, every image needs to be assessed carefully. STScI’s imaging specialists move to professional image editing software to look for artifacts. (GIMP is a great free software option.) Bright star cores may appear black in Webb’s unedited images. This might be jarring to non-astronomers, but it’s a visual cue that speeds up research: Black star cores indicate there’s no useable data to investigate. (Every star has a particular brightness. Knowing how bright a star is and its distance can help researchers determine the amount of energy it emits. If the star’s brightness exceeds what Webb’s detectors can capture, there is no information to pull.) Since some stars have very bright cores, our imaging specialists sample nearby bright pixels (which are typically almost pure white) and use them to replace the cores of stars. The process is similar for cores of bright galaxies.
Sometimes, detectors within Webb’s cameras can produce striations in the image, referred to as readout noise or 1/f noise. These appear as lines in the image background. Much of the readout noise is rejected by the camera itself, but it is important to carefully inspect the images to ensure none snuck through. (Read more about the NIRCam detector readout patterns.) Our imaging specialists work to carefully remove every striation that appears.
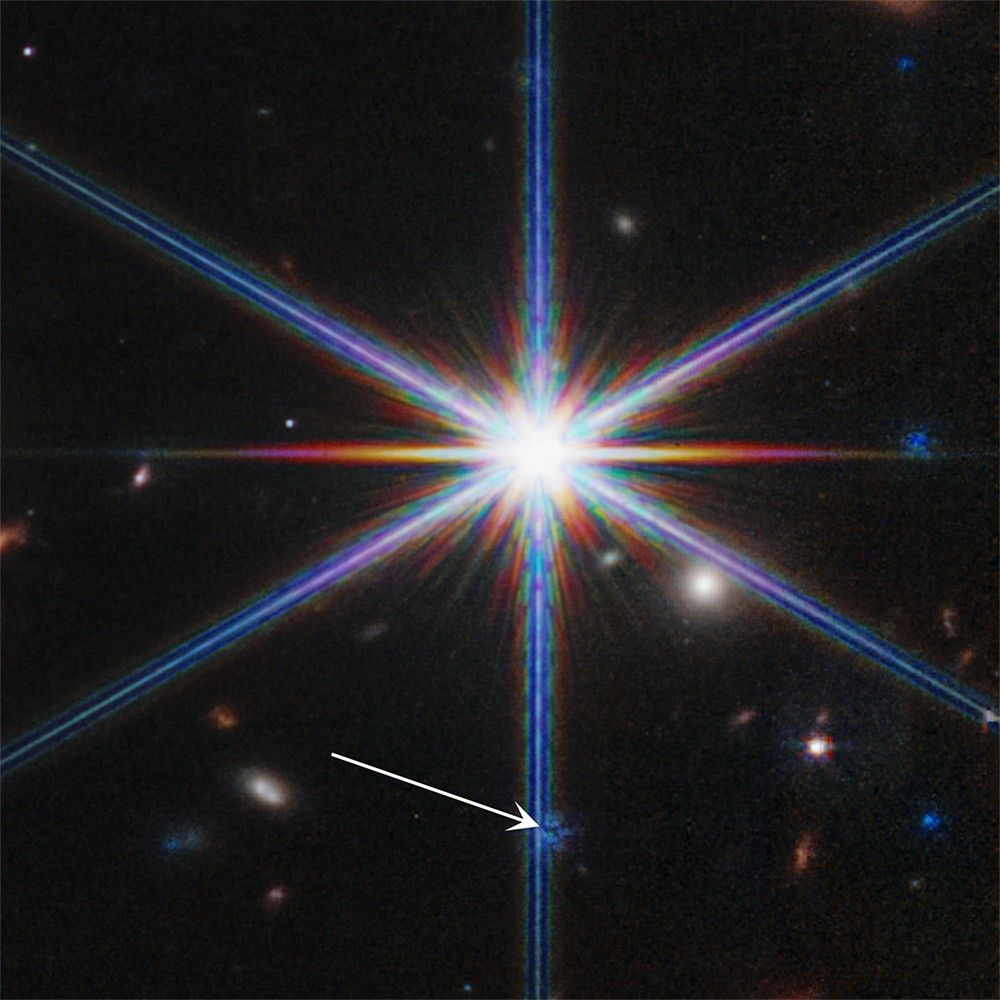
Occasionally, a star will oversaturate pixels on a camera’s detector. As a result, when Webb takes additional images with the same filter, the star’s appearance persists across several frames. For example, in Webb’s First Deep Field, the bright star at the bottom right persisted through several images. It didn’t reappear as large as it did in the original image, though, since its brightest light was deposited in only a few pixels of the camera’s detector. Since this particular image is created from multiple frames, NIRCam’s detector shifted as it took each new image to build the scene, causing the persistent star to reappear elsewhere in the image. In this case, it reappeared as a tiny star within the actual star’s large, lower right diffraction spike. Looking for and removing these repetitions is essential to ensure that the images reflect only the objects that exist in that region of space.
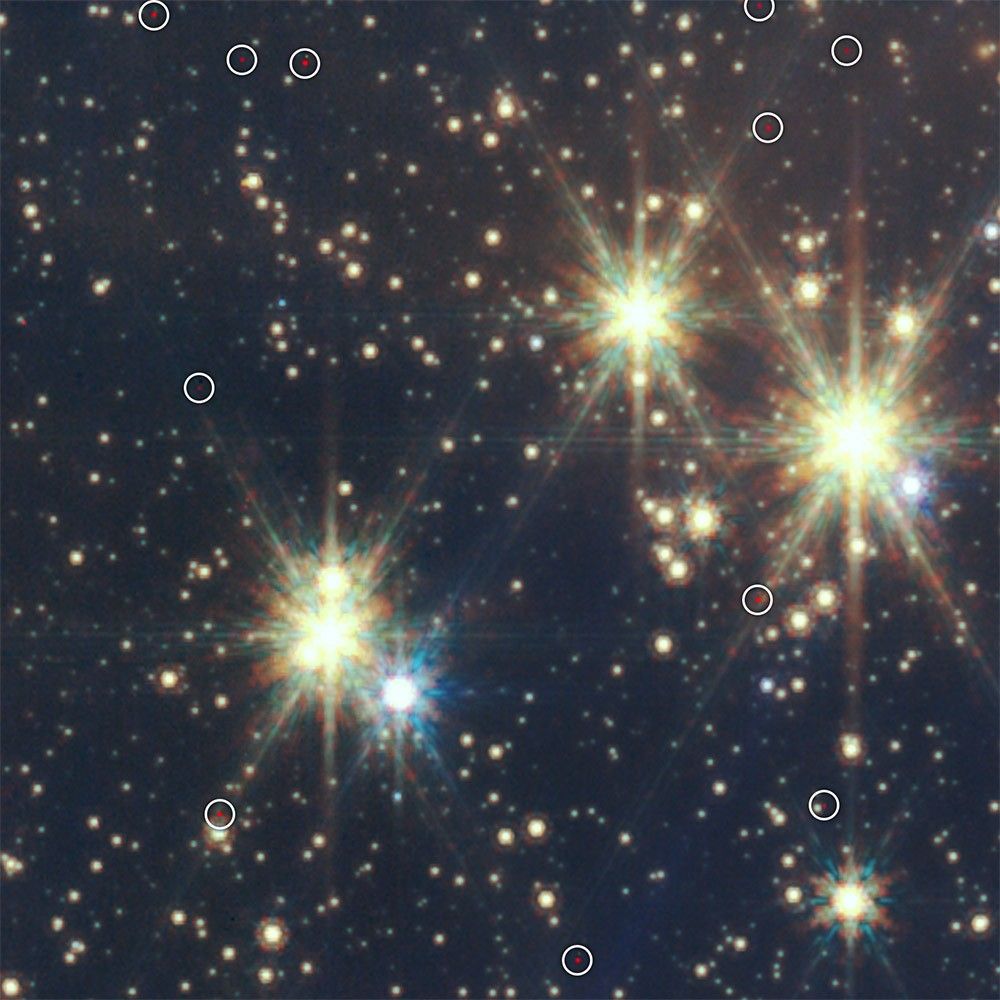
Finally, our staff carefully identify and remove image artifacts caused by energetic charged particles known as cosmic rays. Cosmic rays rain down on the Solar System and can be picked up in space telescope images—this is not unique to Webb. When these particles hit Webb’s detectors, they show up in an image as bright spots, usually as tiny white pixels or short, thin white lines in Webb’s black-and-white unprocessed images. Points appear when cosmic rays directly hit the detector and lines occur when cosmic rays hit at an angle. Our image processors start by assigning colors and then compare multiple images of the same target to identify and replace any bad pixels with the average background level in nearby pixels.
Precisely Applying Color
Infrared light is invisible to our eyes, so image processors translate these wavelengths of light, in order, to visible colors.
Webb observes infrared light, light that is beyond what human eyes are capable of detecting. However, the process of applying color to Webb’s images is remarkably similar to the approach used with the Hubble Space Telescope and other astronomical observatories that observe visible light. Telescopes use advanced filters that can detect specific elements or molecules. This is also why telescope images are typically layered with two or more images from different filters.
In addition to stretching, scaling, and cleaning up artifacts, STScI’s imaging specialists carefully assign individual images from Webb’s various filters to blue, green, and red color channels to align with the color palette human eyes perceive. All the colors we can see are composed of those colors and any digital image we view on a screen can also be broken down into red, green, and blue color channels.
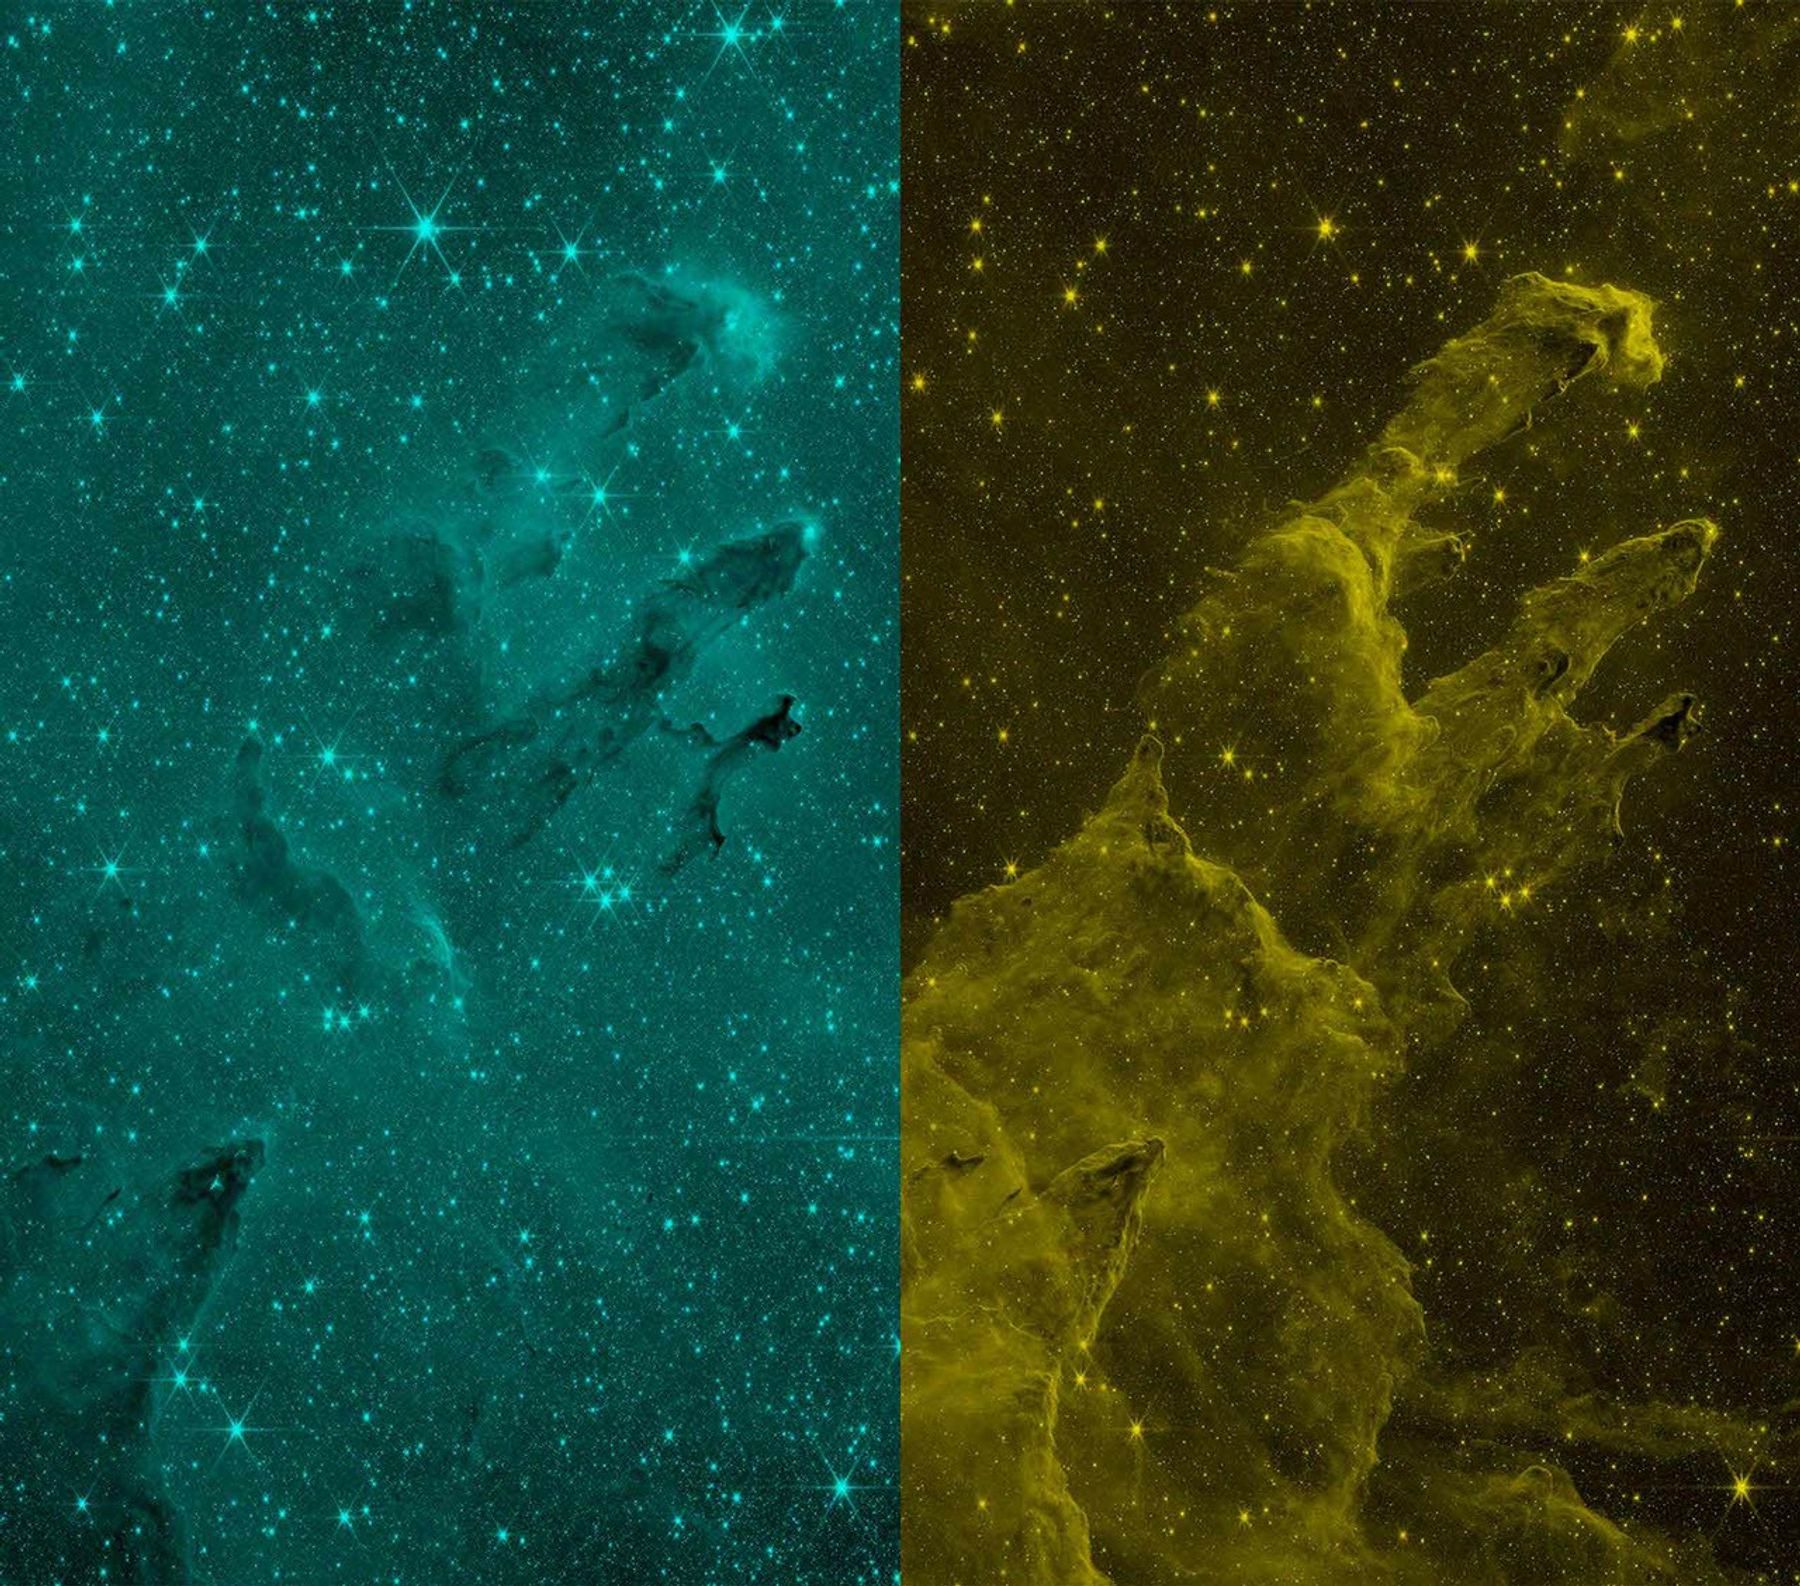
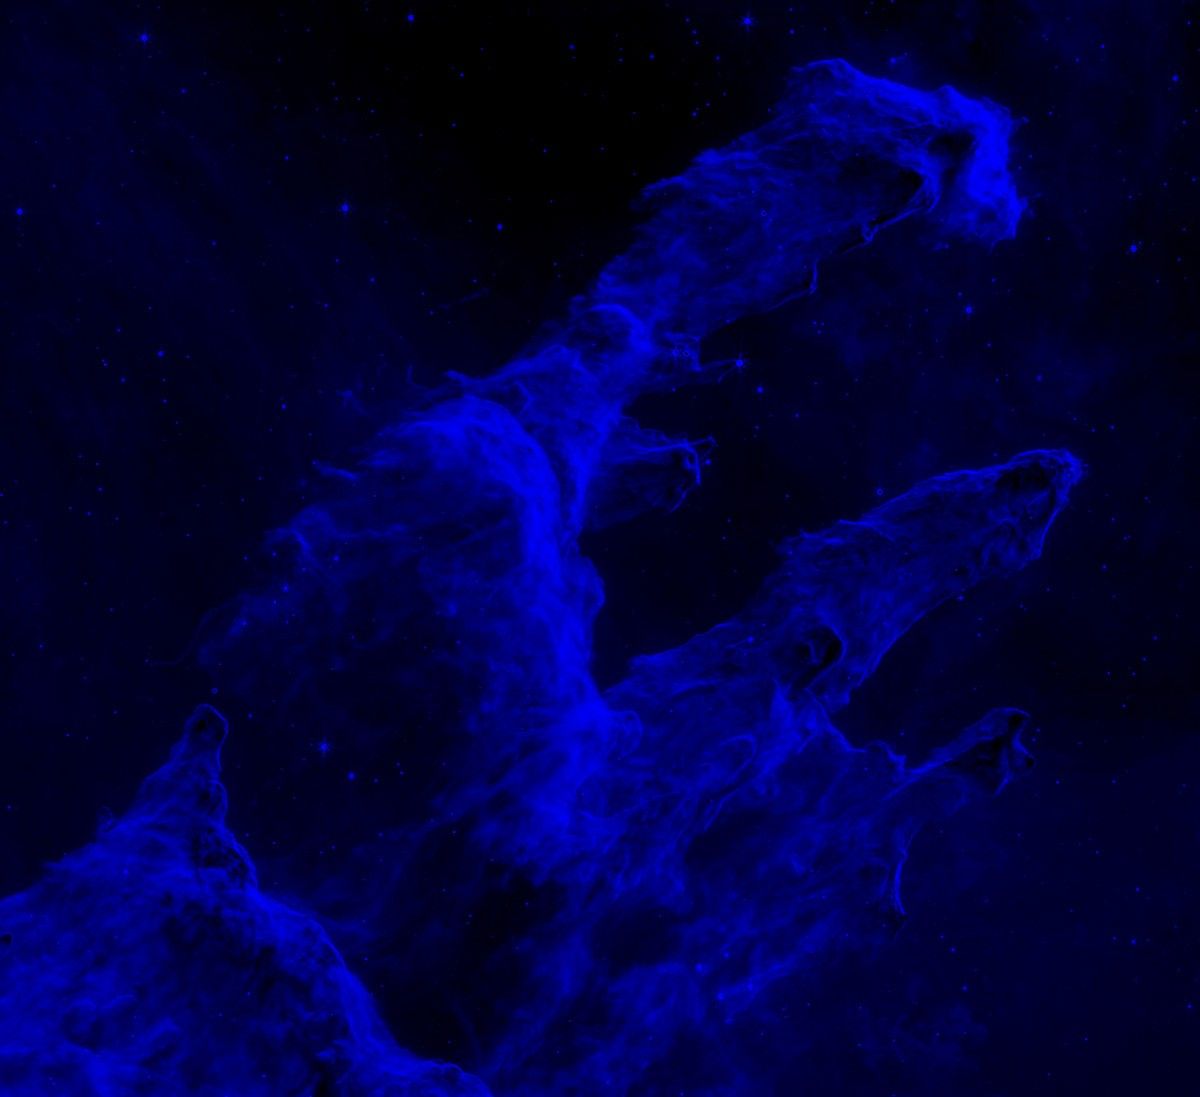
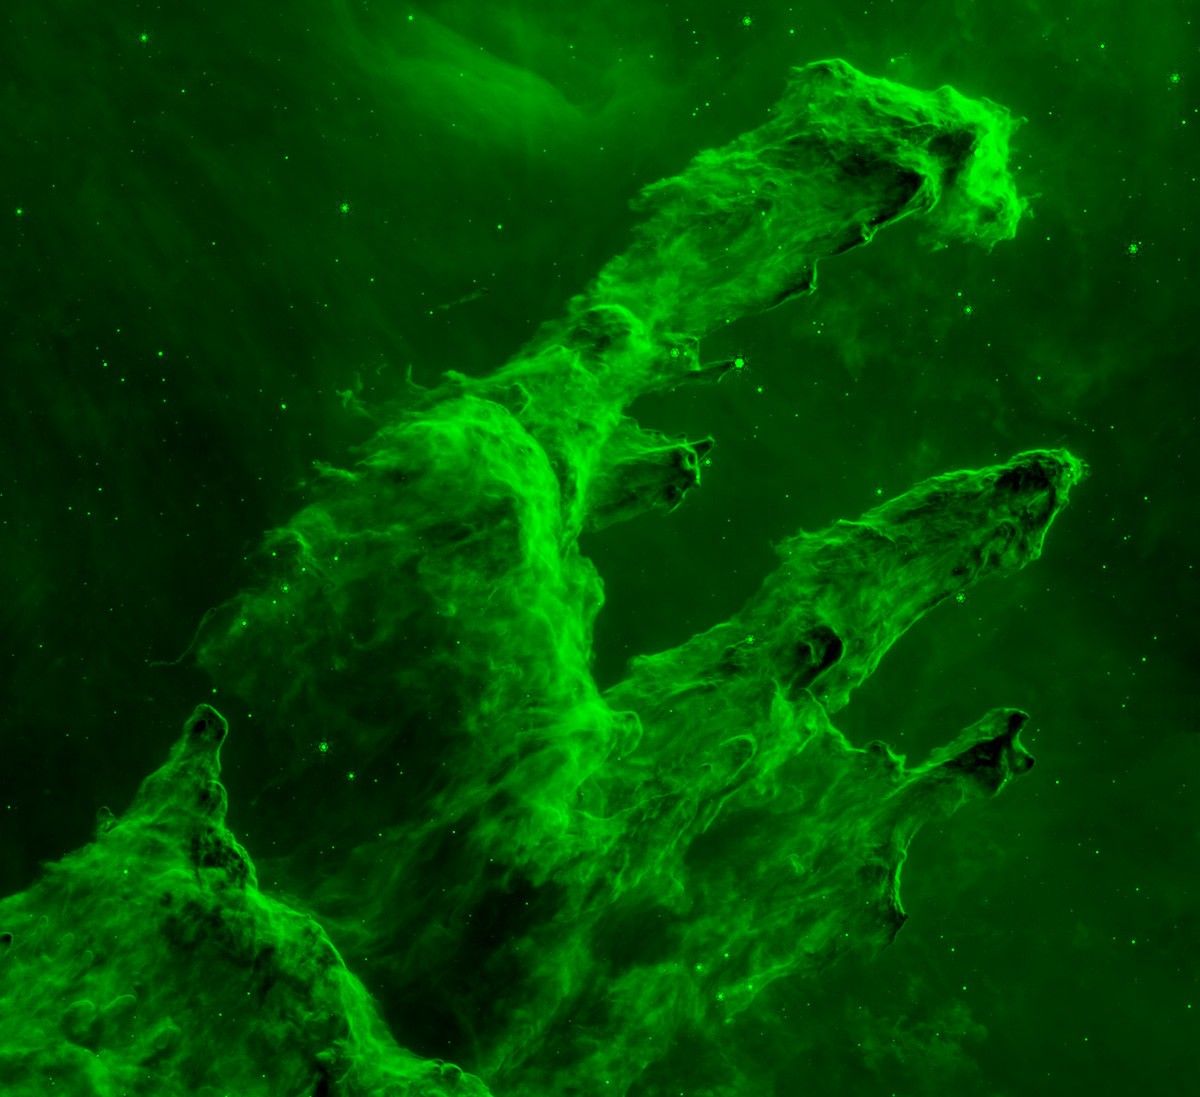
Color is applied chromatically: The shortest wavelengths are assigned blue, slightly longer wavelengths are assigned green, and the longest wavelengths are assigned red. If more than three images make up the final composite image, purple, teal, and orange may be assigned to additional filters that fall before or in between blue, green, and red. Assembling the color image from these images gives our imaging specialists the initial composite image. Yes, there is still work to be done! These initial color images are still only drafts.
Editing for Composition
Carefully considered adjustments draw viewers’ eyes and increase the scientific value of Webb’s images.
One aspect STScI’s imaging specialists assess is the color balance in the image. This is where they may neutralize the overall background, ensuring there are equal levels of red, green, and blue. For example, if one filter adds more background light, it may cause a green cast. Our staff pick a white reference, usually the core of a star, and use it to equalize the white across the image. These steps ensure that there’s a balance among the light in the image from individual filters.
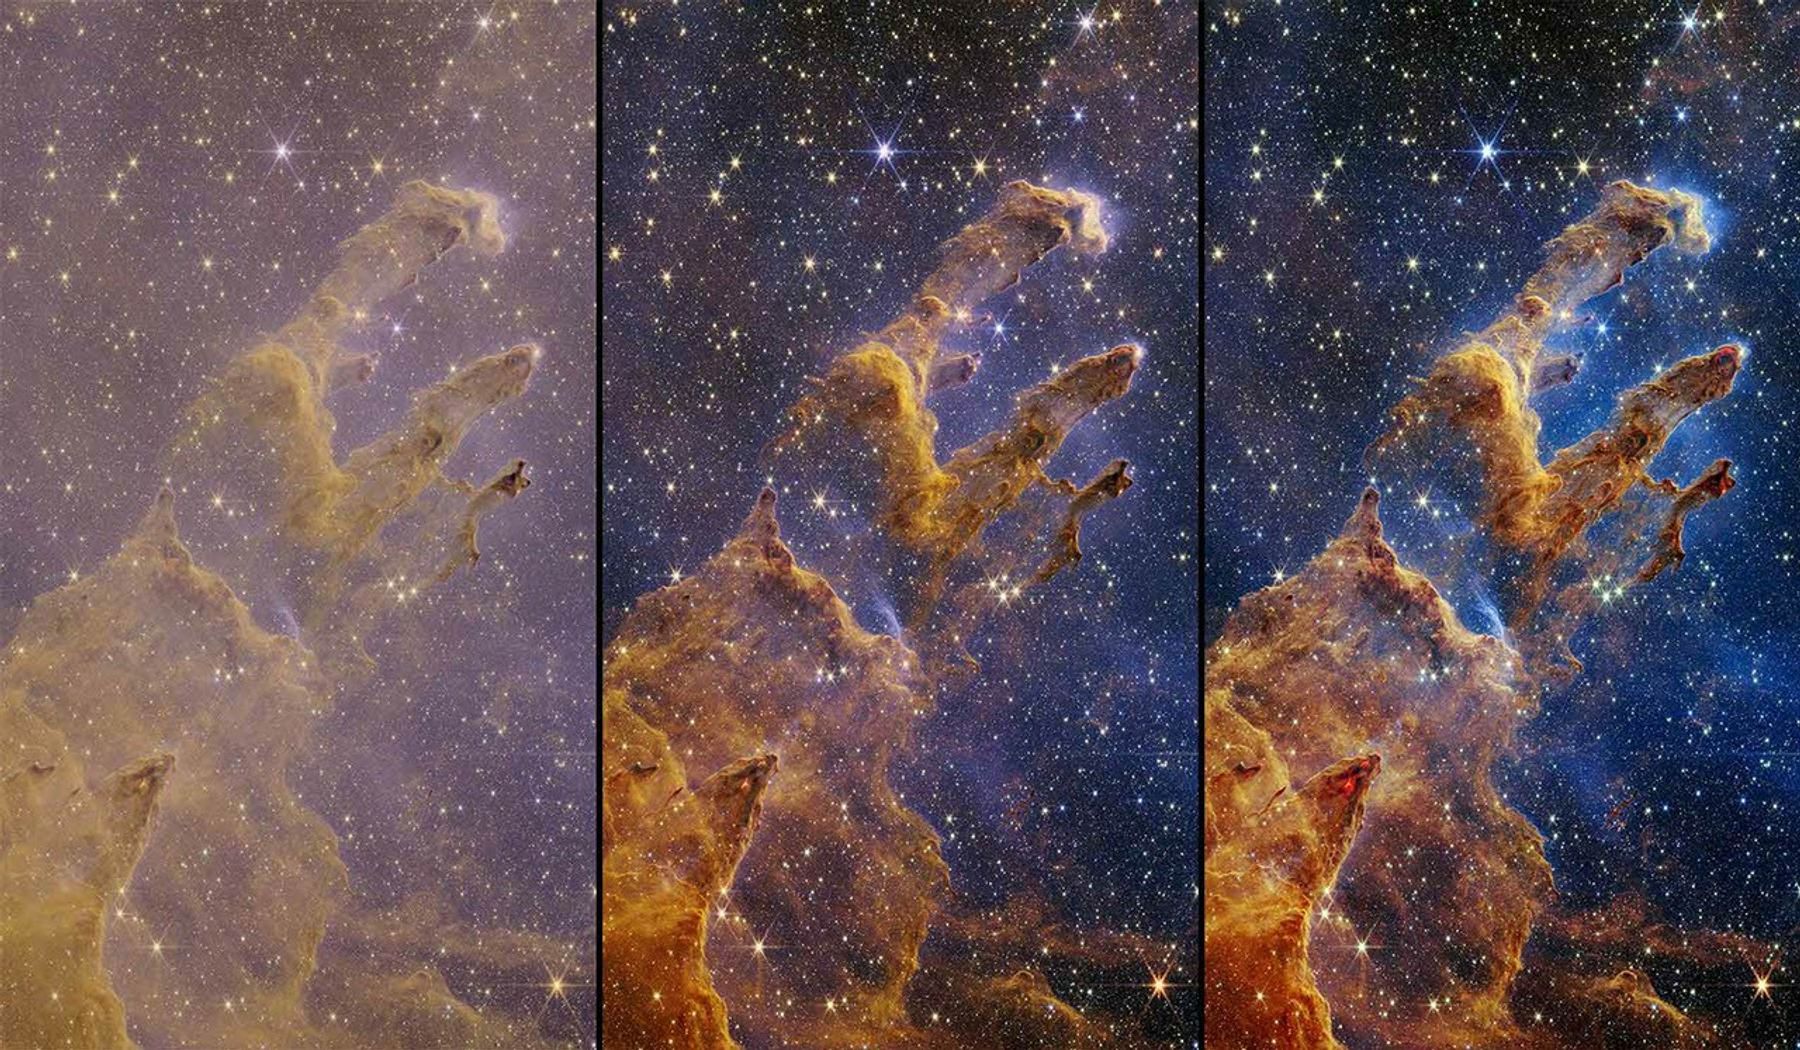
From here, the editing process becomes more subjective. STScI’s imaging specialists follow the visual principles of photography to bring out details that may appear flat or dull in the initial color composite. There is an enormous amount of visual depth and dimension contained within Webb’s data and it is their responsibility to present it in the best possible way while maintaining the integrity of the original data.
Our imaging specialists work to ensure the features that are the focus of the science pop out or draw the eye. This may lead to additional hue adjustments along with cropping. They may also rotate the image to ensure either the cropping is limited or the presentation of the object is ideal, drawing the eye along the frame easily. For example, if Webb’s camera points like a rhombus, a shifted square, they may need to consider the image’s orientation. Would rotating it 45 degrees counterclockwise look strange or cause them to crop out too much data? These are examples of what they encounter and consider. Sometimes their orientation choices echo familiar landscapes. For example, Webb’s Cosmic Cliffs in the Carina Nebula would look “heavy” if they were turned upside down, as if a mountain range appeared above the horizon.
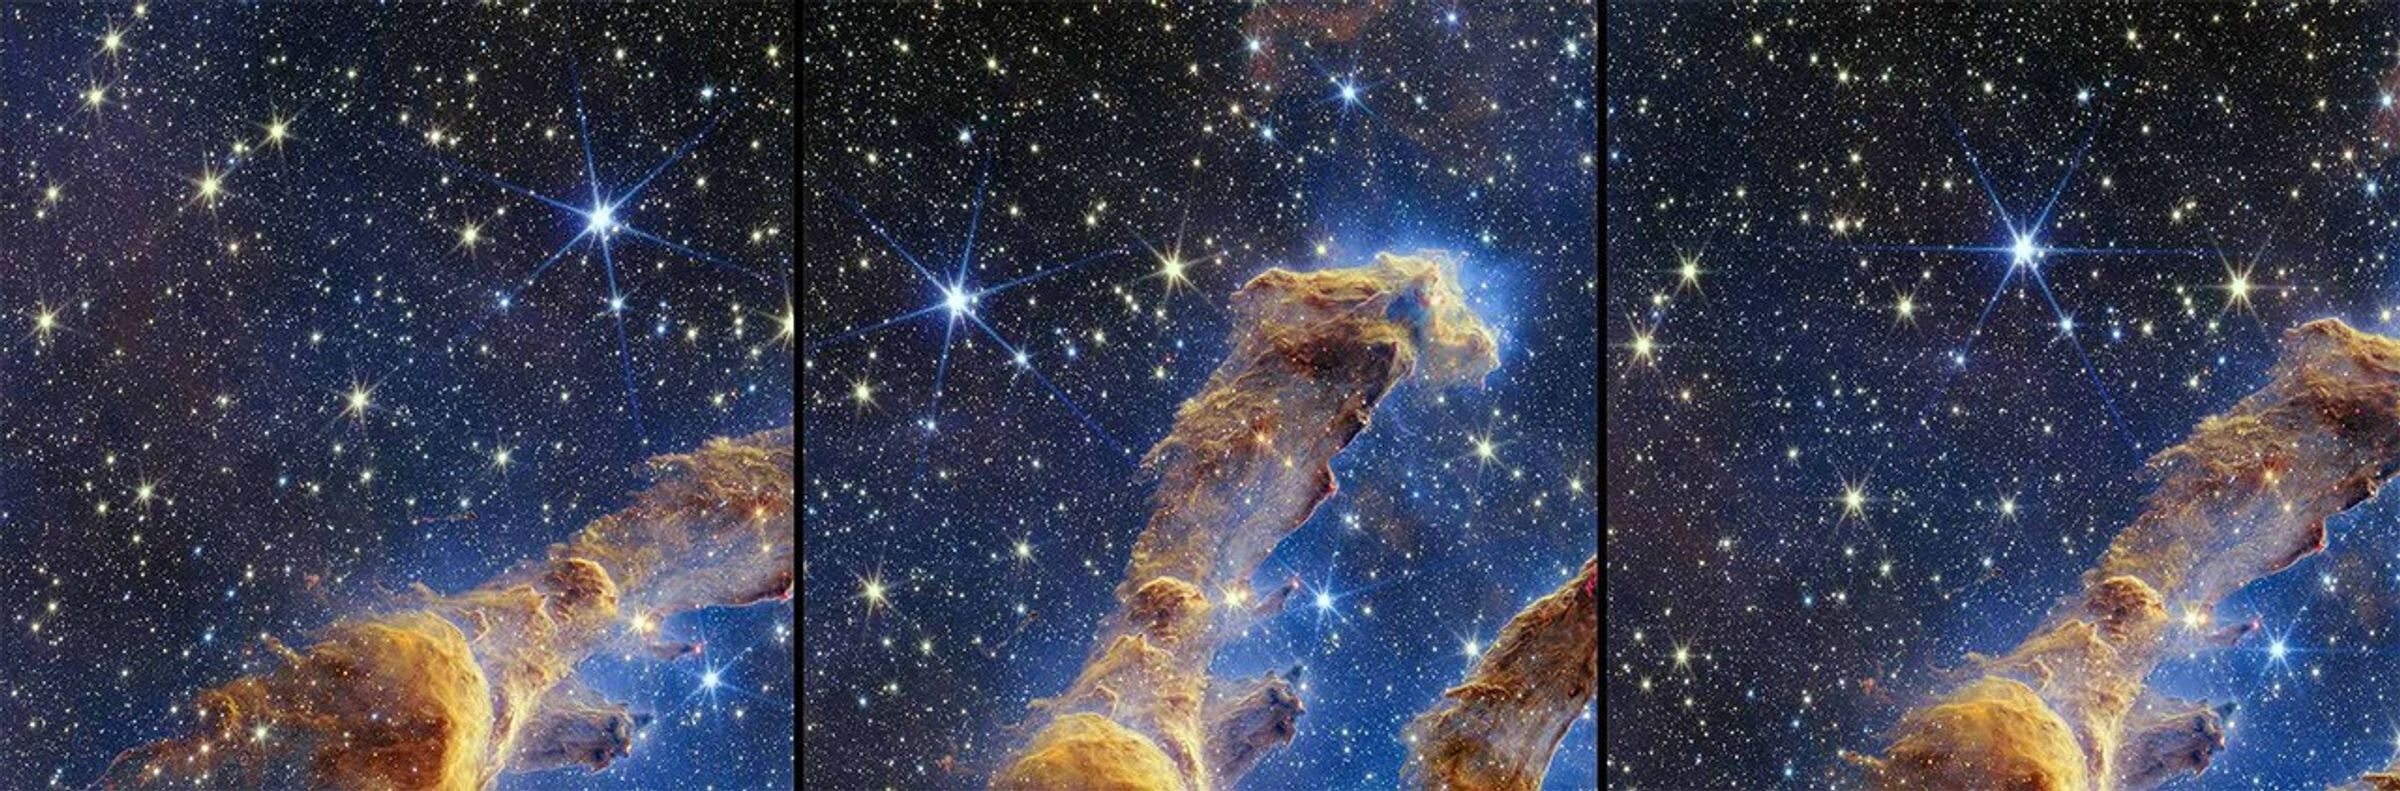
Additionally, the image specialists have intentionally preserved the orientation of the stars in Webb’s near-infrared images, to show the diffraction spikes in the same orientation in almost every release. They are permitted to reorient the images—there’s no “up” in space after all. But to their eyes, seeing their vertical and horizontal diffraction spikes in NIRCam images parallel to the verticals and horizontals of the edges of the image helps orient viewers. This is due in part to the fact that the angles between the stars’ spikes aren’t equal.
Our staff also typically crop the images to be square or rectangular, giving Webb’s images a cinematic quality while preserving the majority of the scene Webb delivered. Since these elements of the image processing are subjective, our imaging specialists spend the most amount of time editing the images at this stage, conferring with one another and a team of designers for comments and suggestions. In every case, their goal is to release images that are scientifically accurate and immediately engaging.
Scientific Image Review
Our imaging specialists collaborate closely with scientists before releasing Webb’s images.
For every image they create, STScI’s imaging specialists not only collaborate with their larger team of designers, but also with the scientists who led the observations. Webb typically releases images that are based on scientific research published in peer-reviewed journals. Reviewing the images before they are finalized with these investigators is crucial, and can lead to important changes. Scientists are often focused on how an image will be perceived, and seek to ensure that the image supports and provides a visual explanation of their discoveries.
Releasing Webb’s Full-Color Images
Highly skilled image specialists work hard to produce immersive images that highlight Webb’s scientific capabilities.
Phew! If you’ve read this article top to bottom, you now realize how much work is poured into creating Webb’s images. Our imaging specialists stretch and rescale the black-and-white images, remove artifacts, apply color in chromatic order, assess the composite image’s composition, and review and edit with designers and scientists. All of these efforts highlight Webb’s scientific discoveries and lead to immersive images that capture the public’s attention.
While STScI’s imaging specialists are working to edit Webb’s images, writers on our news team work in parallel to write engaging text for the press release and image captions, fully explaining what we’re seeing, what was discovered, and describing the images with alternative text for those who are blind or have low vision. The team collaborates not only to showcase Webb’s images, but also to explain them and help readers immerse themselves in exciting astronomical discoveries. As we like to say, the universe is for everyone!
Explore all of Webb’s news releases or take a tour through its extensive image gallery. Want Webb’s press releases sent straight to your inbox so you never miss an image? Sign up for the STScI Inbox Astronomy Newsletter at the bottom of our news page.
At a Glance: Color Assignments in Near- and Mid-Infrared Images
Colors are assigned in chromatic order (blue, green, red) from shortest wavelength to longest wavelength for both of Webb’s cameras.
Webb has two main cameras onboard! Its Near-Infrared Camera (NIRCam) captures shorter wavelengths of infrared light. Its Mid-Infrared Instrument (MIRI) captures longer wavelengths of infrared light. When applying color to images from MIRI, STScI’s imaging specialists follow the principles outlined above for NIRCam. In total, MIRI has 9 filters, while NIRCam has 29 filters. MIRI’s composite images typically include three or four filters that are combined to create a final full-color image. NIRCam composite images typically contain four or five filters.
Each of Webb’s filters has a formal name that represents the specific range of infrared light it captures. Webb’s infrared light is measured in microns, a unit of length equal to one millionth of a meter. Below are listed the filters most often assigned particular colors, along with their measurements in microns. Our image processors use these specs as a baseline. Sometimes they reassign a filter from one color to the next along the spectrum to support the science.
NIRCam (Near-Infrared Light)

MIRI (Mid-Infrared Light)
There are quite a large number of filter combinations that can appear in all of Webb’s images! Let’s say researchers use six filters for an observation. Once the data are in hand, our image specialists will carefully review what each image contains. Most often, the science drives why a filter may not be added to the final composite image, but it could also be due to its resolution or how much it adds to the composite. For example, if adding a filter muddies the overall look of an image and it becomes harder to identify the stars being studied in that particular region, our staff confer with the scientists about which filters to include, and which to leave out. A dropped filter may still provide a lot of scientific value, but researchers will analyze it separately. There is a lot of discussion about which filters the final full-color image contains.
Combining Webb's Near- and Mid-Infrared Images
There are two ways our imaging specialists combine images from NIRCam and MIRI.
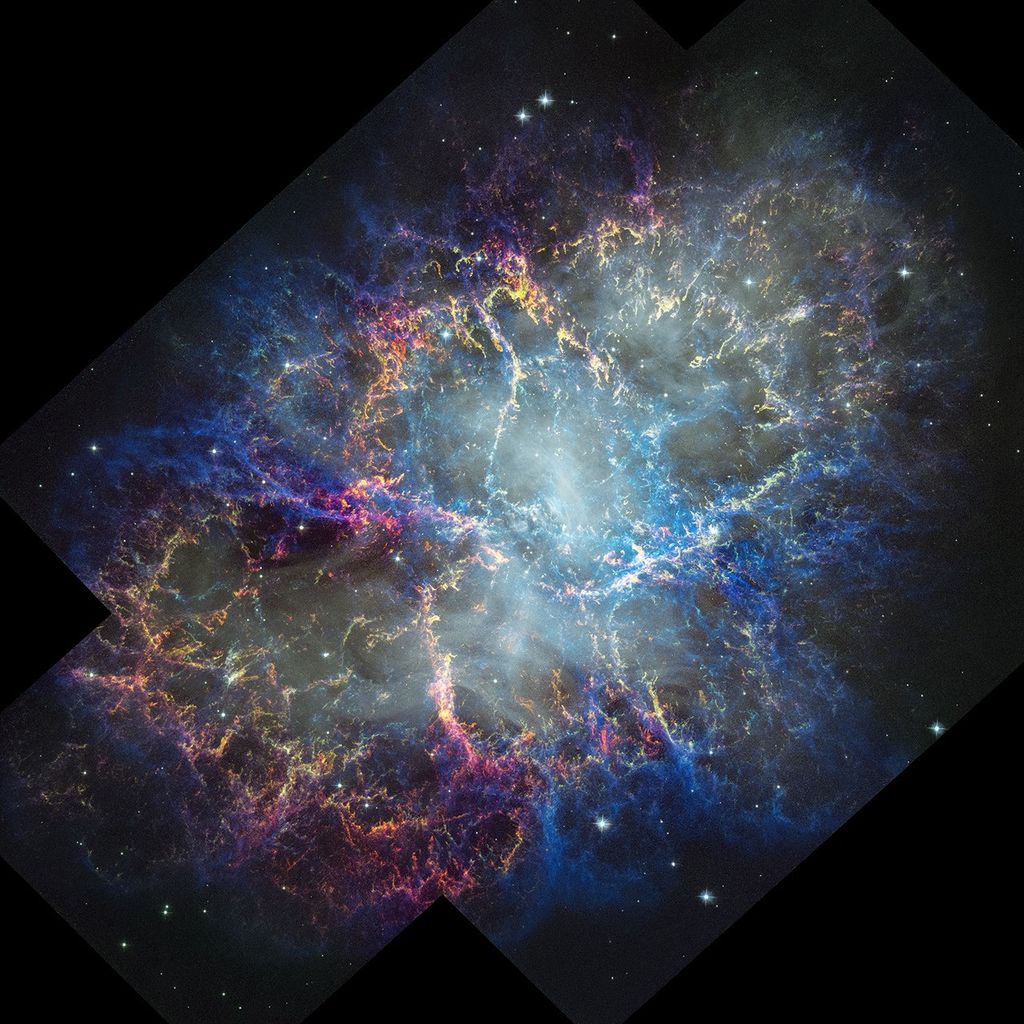
When combining two composite images, one featuring near-infrared light from NIRCam and another featuring mid-infrared light from MIRI, our imaging specialists have found that two approaches work. They can either layer the light from each camera along the electromagnetic spectrum, starting with near-infrared light and working their way over to longer mid-infrared light filters, or they can weave them together based on their individual filter color assignments, which means the colors are knitted together.

For example, Stephan’s Quintet and the Cartwheel Galaxy show light from shortest wavelength to longest wavelength. For both composites, NIRCam’s near-infrared light filters were assigned blue, green, yellow, and red hues, while MIRI’s mid-infrared filters fall only within orange and red hues.
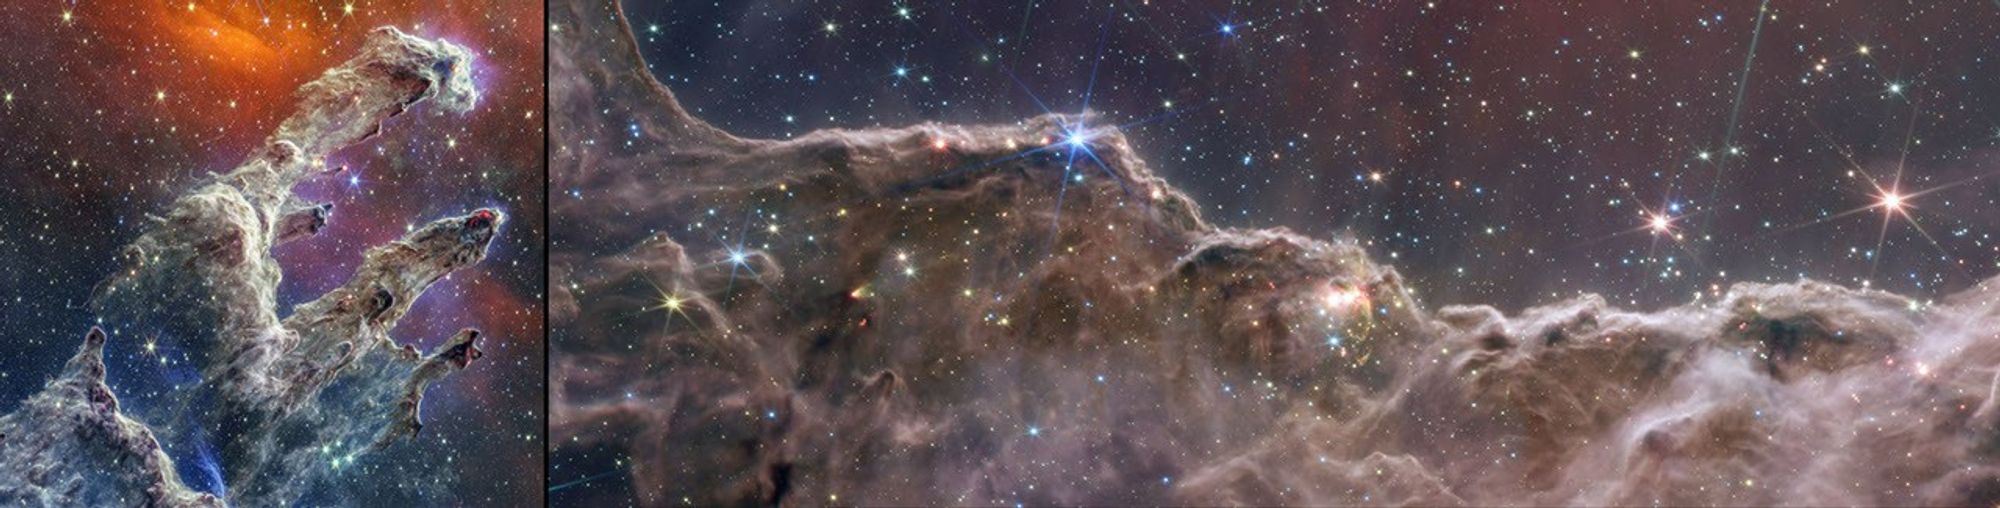
However, when combining the near- and mid-infrared images for the Pillars of creation and the Cosmic Cliffs in the Carina Nebula, a new tactic yielded a more effective, compelling composite. Our image processors wove the filters from NIRCam and MIRI together, like threads in a woven blanket. This approach created images that capture attention and highlight the science. In the Pillars of Creation and the Carina Nebula, both NIRCam and MIRI filters were assigned cooler colors, like purple, blue, and teal, along with greens and reds. Sometimes, it’s not clear even to our staff which approach is best until they combine Webb’s near- and mid-infrared images.
Try It Yourself!
Process existing images from NASA’s space telescopes, or capture and process your own!
Participate in an upcoming NASA’s Astrophoto Challenge, a project part of NASA’s Universe of Learning, to process an astronomical image on your own. You may use the raw data from a space-based telescope or capture new telescope data with a MicroObservatory Robotic Telescope Network ground-based telescope. Then, use the browser-based JS9-4L software, which is similar to what astronomers use (not what is described above about our image processors), to edit the image. Find the full suite of tools used in the challenge, along with video tutorials to guide you as you learn.
Or, dive more deeply into how Webb and Hubble Space Telescope images are made by reading our imaging specialists’ blog, Illuminated Universe:
- “Tangled in the Tarantula Nebula,” a post about Webb’s first images and how the colors were applied
- Part I: “What Color Is Mars?” a post that centers on Hubble images
- Part II: “Are the Colors Real?” post about colors in Hubble images
- Part III: “What Makes Them Real?” post specific to Hubble images